Dell Force10 C300 Quick Start Guide - Page 12
Installing DC Power Supplies, Leakage Current High Touch Current in AC-powered systems with more - power supply
 |
View all Dell Force10 C300 manuals
Add to My Manuals
Save this manual to your list of manuals |
Page 12 highlights
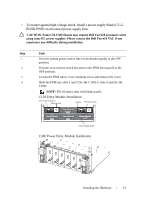
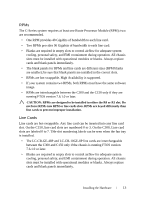
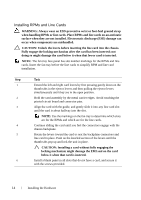
Leakage Current (High Touch Current) in AC-powered systems with more than 3+1 power supplies. The power cord plugs must be secured to the building outlets by the qualified chassis installer or a qualified electrician. WARNING: The C300 operates in either of two voltage ranges. Each range supports a different power supply configuration. As a safety precaution, do not install more than the recommended maximum number of PSUs (given by the table below), as this causes high leakage current. Install blank panels in all unused PSU slots. Voltage 100 -110 200 - 240 Frequency 50/60Hz 50/60Hz Maximum PSU 6 primary + 2 redundant 3 primary + 1 redundant Step Task 1 Verify the switch is in the OFF (left) position. 2 Secure the retaining latch in the unlatched position by tightening the screw into the threaded hole. 3 Slide the power supply into the top left-most power supply slot. Dell Force10 recommends installing power supplies starting from the left side, top row of the chassis, leaving no blank slots between units. 4 Plug the AC power cord into the power receptacle in the face of the power supply. 5 Lower the retaining latch, and tighten it into place. 6 Plug the power cord into an AC power outlet. Installing DC Power Supplies • The C150 requires at least one DC PEM for operation, but Dell Force10 recommends a one-plus-one redundancy configuration. Those DC PEMs are inserted in slots 0 and 2. • The C300 requires at least one DC PEM for operation, but Dell Force10 recommends a one-plus-one redundancy configuration. Those DC PEMs are inserted in slots 0 and 7. 10 Installing the Hardware
-
 1
1 -
2
-
3
-
4
-
5
-
6
-
 7
7 -
 8
8 -
 9
9 -
 10
10 -
 11
11 -
 12
12 -
 13
13 -
 14
14 -
 15
15 -
 16
16 -
 17
17 -
18
-
19
-
20
-
21
-
22
-
23
-
24
-
25
-
26
-
27
-
28
-
29
-
30
-
31
-
32
 |
 |
