Dell Force10 C300 Quick Start Guide - Page 17
Installing the Fan Tray
 |
View all Dell Force10 C300 manuals
Add to My Manuals
Save this manual to your list of manuals |
Page 17 highlights
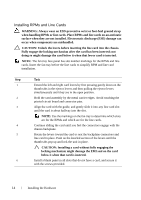
Installing the Fan Tray The C-Series chassis contains one field-replaceable fan tray. There are two types of fan tray that may be installed: one contains six fans that run at varying speeds depending on system temperature; the other one contains six fans that run at a constant speed. For both types of trays, air flows through the system toward the fans (right to left) and is exhausted on fan-side of the chassis. The fan tray is accessible from the front of the chassis. WARNING: To ensure proper temperature and airflow control, the fan tray must always be installed and operating properly. NOTE: The system does not have an air filter so take special care in making sure that the installation site and the chassis itself are cleaned regularly. Step 1 2 3 C150 Task Slide the fan tray into the fan slot. Gently push on the front of the tray until it stops. The fan tray should be flush with the chassis. Use a #2 Phillips screwdriver to secure the fan tray into place by tightening the screws at the top and bottom of the fan tray. 0 1 R0 R1 2 3 fnD0003mp Installing the Hardware 15
-
 1
1 -
2
-
3
-
4
-
5
-
6
-
7
-
8
-
9
-
10
-
11
-
 12
12 -
 13
13 -
 14
14 -
 15
15 -
 16
16 -
 17
17 -
 18
18 -
 19
19 -
 20
20 -
 21
21 -
 22
22 -
23
-
24
-
25
-
26
-
27
-
28
-
29
-
30
-
31
-
32
 |
 |
