Dell Force10 C300 Quick Start Guide - Page 18
Power Up Sequence
 |
View all Dell Force10 C300 manuals
Add to My Manuals
Save this manual to your list of manuals |
Page 18 highlights
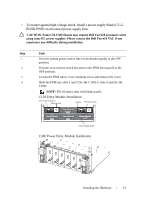
C300 0 1 2 3 R0 R1 4 5 6 7 fnC0003mp NOTE: The fan tray LED will remain lit when the chassis is powered up and the fan tray is functioning properly. Power Up Sequence Before you supply power to the chassis, Dell Force10 recommends that you reinspect your equipment rack and chassis. CAUTION: Never operate the system without a fan tray. CAUTION: The C300 operates in either of two voltage ranges. Each range supports a different supply configuration. As a safety precaution, do not install more than the recommended maximum number of power supplies (given by the table below), as this causes high leakage current. Install blank panels in all unused power supply slots. To supply power to the system: Step Task 1 Verify that the power source complies with the system input power requirements. 2 Energize the remote power source or outlet. 16 Installing the Hardware
-
 1
1 -
2
-
3
-
4
-
5
-
6
-
7
-
8
-
9
-
10
-
11
-
12
-
 13
13 -
 14
14 -
 15
15 -
 16
16 -
 17
17 -
 18
18 -
 19
19 -
 20
20 -
 21
21 -
 22
22 -
 23
23 -
24
-
25
-
26
-
27
-
28
-
29
-
30
-
31
-
32
 |
 |
