Dell Force10 MXL Blade Getting Started Guide - Page 19
Invoking the X-Loader and U-Boot CLIs, Performing the Initial Configuration
 |
View all Dell Force10 MXL Blade manuals
Add to My Manuals
Save this manual to your list of manuals |
Page 19 highlights
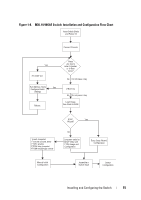
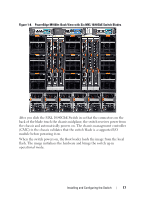
Connect the USB connector on the cable directly to the switch console port. The console port on the MXL 10/40GbE Switch is located below the fixed 40GbE ports (Figure 1-3). Invoking the X-Loader and U-Boot CLIs During the boot process, you can perform various configuration tasks by accessing the X-Loader and U-Boot CLIs, such as running memory tests (X-Loader) and activating the backup image or recovering a password (U-Boot). You are first prompted to enter the X-Loader CLI by pressing any key when the following message is displayed: Hit any key to stop autoboot. If you do not press a key, the boot process continues and you are prompted to enter the U-Boot CLI by pressing any key. After performing any of the X-Loader or U-Boot tasks, the switch automatically reboots when you exit a CLI. To continue with the boot process without entering either CLI, do not press a key. Performing the Initial Configuration Prerequisites: Before you perform the initial switch configuration, make sure that: • The MXL 10/40GbE Switch was never configured before and is in the same state as when you received it. • The MXL 10/40GbE Switch booted successfully when it powered on. • The console connection was established and the Dell Easy Setup Wizard prompt appears on the screen of a VT100 terminal or terminal equivalent. Perform the initial switch configuration through the console port. After the initial configuration, you can manage the switch from the already connected console port or through a remote connection. Installing and Configuring the Switch 19
-
 1
1 -
2
-
3
-
4
-
5
-
6
-
7
-
8
-
9
-
10
-
11
-
12
-
13
-
 14
14 -
 15
15 -
 16
16 -
 17
17 -
 18
18 -
 19
19 -
 20
20 -
 21
21 -
 22
22 -
 23
23 -
 24
24 -
25
-
26
-
27
-
28
-
29
-
30
-
31
-
32
-
33
-
34
-
35
-
36
-
37
-
38
 |
 |