Dell Latitude 7370 Owners Manual - Page 26
Installing the system board, Removing the keyboard, finger print cable - ports
 |
View all Dell Latitude 7370 manuals
Add to My Manuals
Save this manual to your list of manuals |
Page 26 highlights
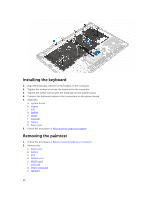
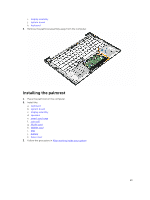
5. Lift the system board from the computer. Installing the system board 1. Align the system board with the screw holders on the computer. 2. Tighten the screws to secure the system board to the computer. 3. Tighten the screws to secure the metal tab over the USB type C port. 4. Connect the following cables to the connectors on the system board: a. speaker cable b. smart card cable c. LED cable d. array mic cable e. touch pad cable f. finger print cable g. WWAN AUX antenna cable h. NFC cable 5. Install the: a. display b. coin cell c. WWAN card d. WLAN card e. SSD f. battery g. base cover 6. Follow the procedure in After working inside your computer. Removing the keyboard 1. Follow the procedure in Before working inside your computer. 2. Remove the: 26
-
 1
1 -
2
-
3
-
4
-
5
-
6
-
7
-
8
-
9
-
10
-
11
-
12
-
13
-
14
-
15
-
16
-
17
-
18
-
19
-
20
-
 21
21 -
 22
22 -
 23
23 -
 24
24 -
 25
25 -
 26
26 -
 27
27 -
 28
28 -
 29
29 -
 30
30 -
 31
31 -
32
-
33
-
34
-
35
-
36
-
37
-
38
-
39
-
40
-
41
-
42
-
43
-
44
-
45
-
46
-
47
-
48
-
49
-
50
-
51
-
52
-
53
-
54
-
55
-
56
-
57
-
58
-
59
-
60
-
61
-
62
-
63
-
64
-
65
-
66
-
67
 |
 |
