Dell Latitude CPi A User Manual - Page 37
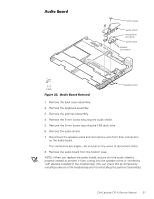
Audio Board, Remove the audio shield.
 |
View all Dell Latitude CPi A manuals
Add to My Manuals
Save this manual to your list of manuals |
Page 37 highlights
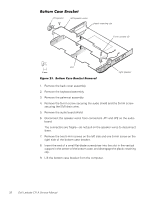
5-mm screw audio shield microphone connector audio board speaker connectors speaker wires 1. Remove the back cover assembly. 2. Remove the keyboard assembly. 3. Remove the palmrest assembly. 4. Remove the 5-mm screw securing the audio shield. 5. Remove the 5-mm screw securing the EMI drain wire. 6. Remove the audio shield. 7. Disconnect the speaker wires and microphone wire from their connectors on the audio board. The connectors are fragile-do not pull on the wires to disconnect them. 8. Remove the audio board from the bottom case. NOTE: When you replace the audio shield, ensure that the audio shield is properly seated to prevent it from cutting into the speaker wires or interfering with devices installed in the modular bay. (You can check this by temporarily installing a device in the modular bay prior to reinstalling the palmrest assembly.) Dell Latitude CPi A Service Manual 31
-
 1
1 -
2
-
3
-
4
-
5
-
6
-
7
-
8
-
9
-
10
-
11
-
12
-
13
-
14
-
15
-
16
-
17
-
18
-
19
-
20
-
21
-
22
-
23
-
24
-
25
-
26
-
27
-
28
-
29
-
30
-
31
-
 32
32 -
 33
33 -
 34
34 -
 35
35 -
 36
36 -
 37
37 -
 38
38 -
 39
39 -
 40
40 -
 41
41 -
 42
42 -
43
-
44
-
45
-
46
-
47
-
48
-
49
-
50
 |
 |
