Dell OpenManage Network Manager OpenManage Network Manager User Guide 5.2 SP1 - Page 348
Truncate, Label, Description, Default Value, Default Coded Value, Valid Values, Remove, Boolean
 |
View all Dell OpenManage Network Manager manuals
Add to My Manuals
Save this manual to your list of manuals |
Page 348 highlights
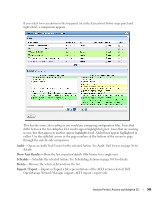
Truncate-Truncate the attribute. Attribute Settings You can create new attribute schemas. See Attribute Editor Panels below for information about different datatypes' fields. Once you create a set of attributes, they remain available for re-use as a schema, or collection of attributes. To identify schemas, enter the following fields: Label- A unique, mandatory identifier for the collection of attributes. Description- A text description of the entity. Click New to create or select an attribute in the displayed tree and click Edit to open an editor where you can create or modify attributes. Select an attribute and click Remove to delete it from the list. Attribute Editor Panels The following panels appears, depending on the attribute type selected from the pick list. The fields in the editor depend on this selection. Available types include Boolean, Coded Value, Date, Decimal, IP Address, Integer, Long, Inventory Reference, and String. The following fields appear for each of these types (omitting redundant fields): NOTE: Configure the data type of an attribute before you save a task. After attributes are in Scripts, you cannot change the data type. Boolean Default Value-Check for True. Coded Value Default Coded Value-Enter the default coded value. If an attribute a Coded Value then enter valid values in the format of NUMBER:Display Label. For example: 10:Hello World 20:Hello Moon Without this pattern a validation error appears. Coded values become a Drop Down (Combo Selection) at runtime containing the Display labels within it (like Hello World, Hello Moon). Selecting one gives the script the numeric value (If users select Hello World, the value the script gets is 10) The default appears by default in this list of alternatives. Enter any other alternatives below this field in the Valid Values. Valid Values-Enter a valid value in the line above the table of valid values, then click the green + to add the value entered to the list. Click the Remove icon (the red -) to delete a selected value. These must be formatted like the Default Coded Value. 348 Actions Portlet | Actions and Adaptive CLI
-
 1
1 -
2
-
3
-
4
-
5
-
6
-
7
-
8
-
9
-
10
-
11
-
12
-
13
-
14
-
15
-
16
-
17
-
18
-
19
-
20
-
21
-
22
-
23
-
24
-
25
-
26
-
27
-
28
-
29
-
30
-
31
-
32
-
33
-
34
-
35
-
36
-
37
-
38
-
39
-
40
-
41
-
42
-
43
-
44
-
45
-
46
-
47
-
48
-
49
-
50
-
51
-
52
-
53
-
54
-
55
-
56
-
57
-
58
-
59
-
60
-
61
-
62
-
63
-
64
-
65
-
66
-
67
-
68
-
69
-
70
-
71
-
72
-
73
-
74
-
75
-
76
-
77
-
78
-
79
-
80
-
81
-
82
-
83
-
84
-
85
-
86
-
87
-
88
-
89
-
90
-
91
-
92
-
93
-
94
-
95
-
96
-
97
-
98
-
99
-
100
-
101
-
102
-
103
-
104
-
105
-
106
-
107
-
108
-
109
-
110
-
111
-
112
-
113
-
114
-
115
-
116
-
117
-
118
-
119
-
120
-
121
-
122
-
123
-
124
-
125
-
126
-
127
-
128
-
129
-
130
-
131
-
132
-
133
-
134
-
135
-
136
-
137
-
138
-
139
-
140
-
141
-
142
-
143
-
144
-
145
-
146
-
147
-
148
-
149
-
150
-
151
-
152
-
153
-
154
-
155
-
156
-
157
-
158
-
159
-
160
-
161
-
162
-
163
-
164
-
165
-
166
-
167
-
168
-
169
-
170
-
171
-
172
-
173
-
174
-
175
-
176
-
177
-
178
-
179
-
180
-
181
-
182
-
183
-
184
-
185
-
186
-
187
-
188
-
189
-
190
-
191
-
192
-
193
-
194
-
195
-
196
-
197
-
198
-
199
-
200
-
201
-
202
-
203
-
204
-
205
-
206
-
207
-
208
-
209
-
210
-
211
-
212
-
213
-
214
-
215
-
216
-
217
-
218
-
219
-
220
-
221
-
222
-
223
-
224
-
225
-
226
-
227
-
228
-
229
-
230
-
231
-
232
-
233
-
234
-
235
-
236
-
237
-
238
-
239
-
240
-
241
-
242
-
243
-
244
-
245
-
246
-
247
-
248
-
249
-
250
-
251
-
252
-
253
-
254
-
255
-
256
-
257
-
258
-
259
-
260
-
261
-
262
-
263
-
264
-
265
-
266
-
267
-
268
-
269
-
270
-
271
-
272
-
273
-
274
-
275
-
276
-
277
-
278
-
279
-
280
-
281
-
282
-
283
-
284
-
285
-
286
-
287
-
288
-
289
-
290
-
291
-
292
-
293
-
294
-
295
-
296
-
297
-
298
-
299
-
300
-
301
-
302
-
303
-
304
-
305
-
306
-
307
-
308
-
309
-
310
-
311
-
312
-
313
-
314
-
315
-
316
-
317
-
318
-
319
-
320
-
321
-
322
-
323
-
324
-
325
-
326
-
327
-
328
-
329
-
330
-
331
-
332
-
333
-
334
-
335
-
336
-
337
-
338
-
339
-
340
-
341
-
342
-
 343
343 -
 344
344 -
 345
345 -
 346
346 -
 347
347 -
 348
348 -
 349
349 -
 350
350 -
 351
351 -
 352
352 -
 353
353 -
354
-
355
-
356
-
357
-
358
-
359
-
360
-
361
-
362
-
363
-
364
-
365
-
366
-
367
-
368
-
369
-
370
-
371
-
372
-
373
-
374
-
375
-
376
-
377
-
378
-
379
-
380
-
381
-
382
-
383
-
384
 |
 |