Dell OpenManage Network Manager OpenManage Network Manager User Guide 5.2 SP1 - Page 40
Portal > Roles, Portal > Portal Settings
 |
View all Dell OpenManage Network Manager manuals
Add to My Manuals
Save this manual to your list of manuals |
Page 40 highlights
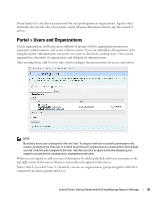
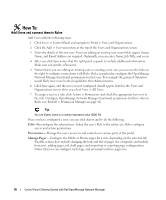
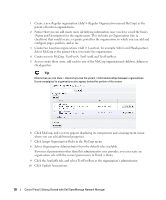
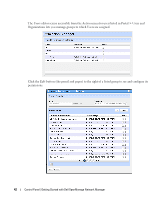
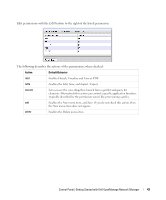
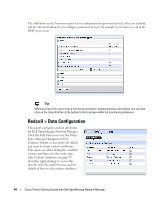
6 Click Add to add permissions. Click the checkboxes to enable the type of permission desired. 7 To do more with Dell OpenManage Network Manager's functional permissions, go to the Redcell > Permission Manager, and click to open this screen. 8 The Role to Permission mapping screen appears. Click the Edit button to the right of listed Roles to see and configure available permissions. 9 Click Advanced to see available permissions organized by Read, Write, Execute, Add or Delete actions. 10 After you have selected permissions, click Apply to accept them and add them to the role. Notice that you can revisit this role, manage it and its membership with the Action button to the right of the role. You can also add users to the group by selecting and editing that user. Portal > Roles Roles determine the applications permissions available to users assigned them; manage them in this screen. To configure functional permissions for the application, see Redcell > Permission Manager on page 41. Click Add to create a Regular Role, Site Role, or Organizational Role. A Regular Role assigns its permissions to its members. A Site or Organizational Role assigns its permissions to a site or organization to which you can assign users. Click the Action button to the right of a role to Edit, view or alter Permissions, Assign Members (this last works to see and assign users). You can also assign role members in the Portal > Users and Organizations user editor. NOTE: Owner Roles do not have an Action button. Owner implies something you have added or created and so actions do not apply. Notice also that when you Assign Members, a screen appears with tabs where you can assign Users, Sites, Organizations and User Roles. Typical best practice is to assign users to one of these collective designations, then assign the collection to a role. Notice also that you can view both Current and Available members with those sub-tabs. You can even Search for members. Click Back (in the upper right corner) or the View All tab to return to the screen listing roles and their Action buttons. Portal > Portal Settings The Settings screens are where users who are administrators can configure the most basic things about Dell OpenManage Network Manager. These include the following: • Mail hosts 40 Control Panel | Getting Started with Dell OpenManage Network Manager
-
 1
1 -
2
-
3
-
4
-
5
-
6
-
7
-
8
-
9
-
10
-
11
-
12
-
13
-
14
-
15
-
16
-
17
-
18
-
19
-
20
-
21
-
22
-
23
-
24
-
25
-
26
-
27
-
28
-
29
-
30
-
31
-
32
-
33
-
34
-
 35
35 -
 36
36 -
 37
37 -
 38
38 -
 39
39 -
 40
40 -
 41
41 -
 42
42 -
 43
43 -
 44
44 -
 45
45 -
46
-
47
-
48
-
49
-
50
-
51
-
52
-
53
-
54
-
55
-
56
-
57
-
58
-
59
-
60
-
61
-
62
-
63
-
64
-
65
-
66
-
67
-
68
-
69
-
70
-
71
-
72
-
73
-
74
-
75
-
76
-
77
-
78
-
79
-
80
-
81
-
82
-
83
-
84
-
85
-
86
-
87
-
88
-
89
-
90
-
91
-
92
-
93
-
94
-
95
-
96
-
97
-
98
-
99
-
100
-
101
-
102
-
103
-
104
-
105
-
106
-
107
-
108
-
109
-
110
-
111
-
112
-
113
-
114
-
115
-
116
-
117
-
118
-
119
-
120
-
121
-
122
-
123
-
124
-
125
-
126
-
127
-
128
-
129
-
130
-
131
-
132
-
133
-
134
-
135
-
136
-
137
-
138
-
139
-
140
-
141
-
142
-
143
-
144
-
145
-
146
-
147
-
148
-
149
-
150
-
151
-
152
-
153
-
154
-
155
-
156
-
157
-
158
-
159
-
160
-
161
-
162
-
163
-
164
-
165
-
166
-
167
-
168
-
169
-
170
-
171
-
172
-
173
-
174
-
175
-
176
-
177
-
178
-
179
-
180
-
181
-
182
-
183
-
184
-
185
-
186
-
187
-
188
-
189
-
190
-
191
-
192
-
193
-
194
-
195
-
196
-
197
-
198
-
199
-
200
-
201
-
202
-
203
-
204
-
205
-
206
-
207
-
208
-
209
-
210
-
211
-
212
-
213
-
214
-
215
-
216
-
217
-
218
-
219
-
220
-
221
-
222
-
223
-
224
-
225
-
226
-
227
-
228
-
229
-
230
-
231
-
232
-
233
-
234
-
235
-
236
-
237
-
238
-
239
-
240
-
241
-
242
-
243
-
244
-
245
-
246
-
247
-
248
-
249
-
250
-
251
-
252
-
253
-
254
-
255
-
256
-
257
-
258
-
259
-
260
-
261
-
262
-
263
-
264
-
265
-
266
-
267
-
268
-
269
-
270
-
271
-
272
-
273
-
274
-
275
-
276
-
277
-
278
-
279
-
280
-
281
-
282
-
283
-
284
-
285
-
286
-
287
-
288
-
289
-
290
-
291
-
292
-
293
-
294
-
295
-
296
-
297
-
298
-
299
-
300
-
301
-
302
-
303
-
304
-
305
-
306
-
307
-
308
-
309
-
310
-
311
-
312
-
313
-
314
-
315
-
316
-
317
-
318
-
319
-
320
-
321
-
322
-
323
-
324
-
325
-
326
-
327
-
328
-
329
-
330
-
331
-
332
-
333
-
334
-
335
-
336
-
337
-
338
-
339
-
340
-
341
-
342
-
343
-
344
-
345
-
346
-
347
-
348
-
349
-
350
-
351
-
352
-
353
-
354
-
355
-
356
-
357
-
358
-
359
-
360
-
361
-
362
-
363
-
364
-
365
-
366
-
367
-
368
-
369
-
370
-
371
-
372
-
373
-
374
-
375
-
376
-
377
-
378
-
379
-
380
-
381
-
382
-
383
-
384
 |
 |