Dell OptiPlex FX160 Dell™ OptiPlex™ FX160 Re-Imaging Guide - Page 3
Dell™ OptiPlex™ FX160 Re-Imaging Guide - bios
 |
View all Dell OptiPlex FX160 manuals
Add to My Manuals
Save this manual to your list of manuals |
Page 3 highlights
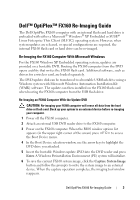
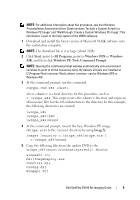
Dell™ OptiPlex™ FX160 Re-Imaging Guide The Dell OptiPlex FX160 computer with an internal flash card hard drive is preloaded with either a Microsoft® Windows® XP Embedded or SUSE® Linux Enterprise Thin Client (SLETC) operating system. However, when system updates are released, or special configurations are required, the internal FX160 flash card or hard drive can be re-imaged. Re-Imaging the FX160 Computer With Microsoft Windows For the FX160 Windows XP Embedded operating system, updates are provided on a bootable DVD. Booting the FX160 computer from the DVD opens a utility that writes the FX160 flash card. Additional software, such as drivers for a wireless card, are loaded separately. The DVD update disk can be transferred to a bootable USB flash drive using a Windows system with Microsoft Windows Automation Installation Kit (WAIK) software. The update can then installed on the FX160 flash card when booting the FX160 computer from the USB flash drive. Re-Imaging an FX160 Computer With the Update DVD CAUTION: Re-imaging your FX160 computer will erase all data from the hard drive or flash card. Back up your system to an external device before re-imaging your computer. 1 Power off the FX160 computer. 2 Attach an external USB DVD reader drive to the FX160 computer. 3 Power on the FX160 computer. When the BIOS window options list appears (in the upper right-corner of the screen) press to access the Boot Device menu. 4 In the Boot Device selection window, use the arrow keys to highlight the DVD drive you attached. 5 Insert the bootable Windows update DVD into the DVD reader and press Enter. A Windows Preinstallation Environment (PE) system will initialize. 6 To save the current FX160 system image, click the Capture System Image button and follow the prompts to write the system image to an external device. When the capture operation completes, the imaging tool window reappears. Dell OptiPlex FX160 Re-Imaging Guide 3
-
 1
1 -
 2
2 -
 3
3 -
 4
4 -
 5
5 -
 6
6 -
 7
7 -
 8
8 -
 9
9 -
10
-
11
-
12
-
13
-
14
-
15
-
16
-
17
-
18
-
19
-
20
-
21
-
22
-
23
-
24
-
25
-
26
-
27
-
28
-
29
-
30
-
31
-
32
-
33
-
34
-
35
-
36
-
37
-
38
-
39
-
40
-
41
-
42
-
43
-
44
-
45
-
46
-
47
-
48
-
49
-
50
-
51
-
52
-
53
-
54
-
55
-
56
-
57
-
58
-
59
-
60
-
61
-
62
-
63
-
64
-
65
-
66
-
67
-
68
-
69
-
70
-
71
-
72
-
73
-
74
-
75
-
76
-
77
-
78
-
79
-
80
-
81
-
82
-
83
-
84
-
85
-
86
-
87
-
88
-
89
-
90
-
91
-
92
-
93
-
94
-
95
-
96
-
97
-
98
-
99
-
100
-
101
-
102
-
103
-
104
-
105
-
106
-
107
-
108
-
109
-
110
-
111
-
112
-
113
-
114
-
115
-
116
-
117
-
118
-
119
-
120
-
121
-
122
-
123
-
124
-
125
-
126
-
127
-
128
-
129
-
130
-
131
-
132
 |
 |