Dell OptiPlex FX160 Dell™ OptiPlex™ FX160 Re-Imaging Guide - Page 8
Re-Imaging the FX160 Computer With SUSE Linux Enterprise Thin Client
 |
View all Dell OptiPlex FX160 manuals
Add to My Manuals
Save this manual to your list of manuals |
Page 8 highlights
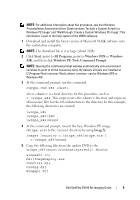
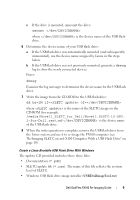
Re-Imaging the FX160 Computer With SUSE Linux Enterprise Thin Client The FX160 computer can be re-imaged with an SLETC update using a bootable USB flash drive built with the update CD and either a Linux or Windows computer system. After the FX160 computer is booted to the USB flash drive, the Thin Client Imaging utility is used to copy SLETC to the FX160 flash card (hard drive). The minimum size for the USB flash drive is 512MB. Create a Linux Bootable USB Flash Drive With Linux The update CD provided includes these three files: • Documentation (*.pdf). • SLETC update file (*.raw). The name of this file reflects the revision level of SLETC. • Windows USB flash drive image installer (USBDiskImageTool.exe). Only the update file is needed to build the bootable USB flash drive. CAUTION: This procedure formats the UFD device used to load the system image. All files on the device are erased. CAUTION: Some of the commands entered in this procedure are performed with administrative privileges. Use extreme care to prevent typing errors, which could result in serious damage to your Linux operating system. 1 On the Linux desktop, open a terminal window. 2 If not logged in as a "root" user, enter the command: su - 3 Mount the CD-ROM containing the SLETC update. Many Linux distributions mount the CD automatically when it is loaded. For this procedure, it is assumed that the CD is mounted as: /media/Novell_SLETC_for_Dell 4 Insert a USB flash drive into a USB port. 5 Determine whether or not the USB flash drive is mounted: a Enter: mount b Examine the output to determine if the USB flash drive is mounted. 8 Dell OptiPlex FX160 Re-Imaging Guide
-
 1
1 -
2
-
 3
3 -
 4
4 -
 5
5 -
 6
6 -
 7
7 -
 8
8 -
 9
9 -
 10
10 -
 11
11 -
 12
12 -
 13
13 -
14
-
15
-
16
-
17
-
18
-
19
-
20
-
21
-
22
-
23
-
24
-
25
-
26
-
27
-
28
-
29
-
30
-
31
-
32
-
33
-
34
-
35
-
36
-
37
-
38
-
39
-
40
-
41
-
42
-
43
-
44
-
45
-
46
-
47
-
48
-
49
-
50
-
51
-
52
-
53
-
54
-
55
-
56
-
57
-
58
-
59
-
60
-
61
-
62
-
63
-
64
-
65
-
66
-
67
-
68
-
69
-
70
-
71
-
72
-
73
-
74
-
75
-
76
-
77
-
78
-
79
-
80
-
81
-
82
-
83
-
84
-
85
-
86
-
87
-
88
-
89
-
90
-
91
-
92
-
93
-
94
-
95
-
96
-
97
-
98
-
99
-
100
-
101
-
102
-
103
-
104
-
105
-
106
-
107
-
108
-
109
-
110
-
111
-
112
-
113
-
114
-
115
-
116
-
117
-
118
-
119
-
120
-
121
-
122
-
123
-
124
-
125
-
126
-
127
-
128
-
129
-
130
-
131
-
132
 |
 |