Dell OptiPlex GX260 Service Manual - Page 44
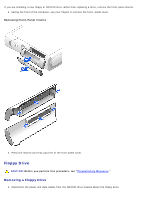
If the CD/DVD drive bay was previously empty, remove the front- panel inserts see
 |
View all Dell OptiPlex GX260 manuals
Add to My Manuals
Save this manual to your list of manuals |
Page 44 highlights
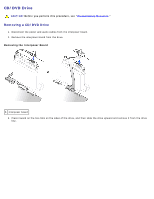
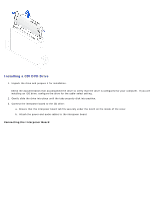
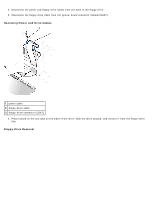
1 interposer board 2 notch on inside of cover 3 interposer board tab If your computer came with an IDE CD drive, use the spare connector on the existing interface cable. Otherwise, use the IDE interface cable provided in the drive kit. 4. If you are installing a drive that has its own controller card, install the controller card in an expansion slot. 5. Check all cable connections, and fold cables out of the way to provide airflow for the fan and cooling vents. 6. If the CD/DVD drive bay was previously empty, remove the front- panel inserts (see "Front-Panel Inserts"). 7. Close the computer cover. 8. Attach the computer stand (optional).
-
 1
1 -
2
-
3
-
4
-
5
-
6
-
7
-
8
-
9
-
10
-
11
-
12
-
13
-
14
-
15
-
16
-
17
-
18
-
19
-
20
-
21
-
22
-
23
-
24
-
25
-
26
-
27
-
28
-
29
-
30
-
31
-
32
-
33
-
34
-
35
-
36
-
37
-
38
-
 39
39 -
 40
40 -
 41
41 -
 42
42 -
 43
43 -
 44
44 -
 45
45 -
 46
46 -
 47
47 -
 48
48 -
 49
49 -
50
-
51
-
52
-
53
-
54
-
55
-
56
-
57
-
58
-
59
-
60
-
61
-
62
-
63
-
64
-
65
-
66
-
67
-
68
-
69
-
70
-
71
-
72
-
73
-
74
-
75
-
76
-
77
-
78
-
79
-
80
-
81
-
82
-
83
-
84
-
85
-
86
-
87
-
88
-
89
-
90
-
91
-
92
-
93
-
94
-
95
-
96
-
97
-
98
-
99
-
100
 |
 |

1
interposer board
2
notch on inside of cover
3
interposer board tab
If your computer came with an IDE CD drive, use the spare connector on the existing interface cable. Otherwise, use
the IDE interface cable provided in the drive kit.
4. If you are installing a drive that has its own controller card, install the controller card in an expansion slot.
5. Check all cable connections, and fold cables out of the way to provide airflow for the fan and cooling vents.
6. If the CD/DVD drive bay was previously empty, remove the front- panel inserts (see "
Front-Panel Inserts
").
7. Close the computer cover.
8. Attach the computer stand (optional).