Dell OptiPlex GX260 Service Manual - Page 52
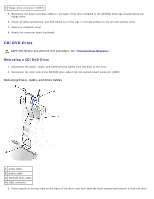
Connecting Power, Audio, and Drive Cables, and CD/DVD drive cables to the drive.
 |
View all Dell OptiPlex GX260 manuals
Add to My Manuals
Save this manual to your list of manuals |
Page 52 highlights
bay. Installing a CD/DVD Drive 1. Unpack the drive and prepare it for installation. Check the documentation that accompanied the drive to verify that the drive is configured for your computer. If you are installing an IDE drive, configure the drive for the cable-select setting. 2. If the replacement drive does not have the bracket rails attached, see step 2 in the previous section for instructions on attaching rails. 3. Gently slide the drive into place until the tabs securely click into position. 4. Connect the power, audio, and CD/DVD drive cables to the drive. 5. Connect the other end of the CD/DVD drive cable to the IDE2 system board connector. Connecting Power, Audio, and Drive Cables
-
 1
1 -
2
-
3
-
4
-
5
-
6
-
7
-
8
-
9
-
10
-
11
-
12
-
13
-
14
-
15
-
16
-
17
-
18
-
19
-
20
-
21
-
22
-
23
-
24
-
25
-
26
-
27
-
28
-
29
-
30
-
31
-
32
-
33
-
34
-
35
-
36
-
37
-
38
-
39
-
40
-
41
-
42
-
43
-
44
-
45
-
46
-
 47
47 -
 48
48 -
 49
49 -
 50
50 -
 51
51 -
 52
52 -
 53
53 -
 54
54 -
 55
55 -
 56
56 -
 57
57 -
58
-
59
-
60
-
61
-
62
-
63
-
64
-
65
-
66
-
67
-
68
-
69
-
70
-
71
-
72
-
73
-
74
-
75
-
76
-
77
-
78
-
79
-
80
-
81
-
82
-
83
-
84
-
85
-
86
-
87
-
88
-
89
-
90
-
91
-
92
-
93
-
94
-
95
-
96
-
97
-
98
-
99
-
100
 |
 |

bay.
Installing a CD/DVD Drive
1. Unpack the drive and prepare it for installation.
Check the documentation that accompanied the drive to verify that the drive is configured for your computer. If you are
installing an IDE drive, configure the drive for the cable-select setting.
2. If the replacement drive does not have the bracket rails attached, see
step 2
in the previous section for instructions on
attaching rails.
3. Gently slide the drive into place until the tabs securely click into position.
4. Connect the power, audio, and CD/DVD drive cables to the drive.
5. Connect the other end of the CD/DVD drive cable to the IDE2 system board connector.
Connecting Power, Audio, and Drive Cables