Dell OptiPlex GX260 Service Manual - Page 51
Removing a CD/DVD Drive, Removing Power, Audio, and Drive Cables
 |
View all Dell OptiPlex GX260 manuals
Add to My Manuals
Save this manual to your list of manuals |
Page 51 highlights
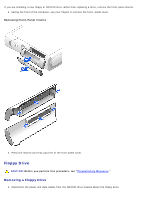
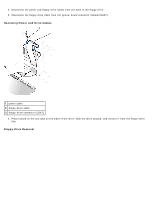
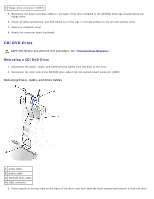
3 floppy-drive connector (DSKT) 5. Reconnect the power and data cables to the back of the drive installed in the CD/DVD drive bay located above the floppy drive. 6. Check all cable connections, and fold cables out of the way to provide airflow for the fan and cooling vents. 7. Close the computer cover. 8. Attach the computer stand (optional). CD/DVD Drive CAUTION: Before you perform this procedure, see "Precautionary Measures." Removing a CD/DVD Drive 1. Disconnect the power, audio, and CD/DVD drive cables from the back of the drive. 2. Disconnect the other end of the CD/DVD drive cable from the system board connector (IDE2). Removing Power, Audio, and Drive Cables 1 audio cable 2 power cable 3 CD/DVD drive cable 4 IDE2 connector 3. Press inward on the two tabs on the sides of the drive, and then slide the drive upward and remove it from the drive
-
 1
1 -
2
-
3
-
4
-
5
-
6
-
7
-
8
-
9
-
10
-
11
-
12
-
13
-
14
-
15
-
16
-
17
-
18
-
19
-
20
-
21
-
22
-
23
-
24
-
25
-
26
-
27
-
28
-
29
-
30
-
31
-
32
-
33
-
34
-
35
-
36
-
37
-
38
-
39
-
40
-
41
-
42
-
43
-
44
-
45
-
 46
46 -
 47
47 -
 48
48 -
 49
49 -
 50
50 -
 51
51 -
 52
52 -
 53
53 -
 54
54 -
 55
55 -
 56
56 -
57
-
58
-
59
-
60
-
61
-
62
-
63
-
64
-
65
-
66
-
67
-
68
-
69
-
70
-
71
-
72
-
73
-
74
-
75
-
76
-
77
-
78
-
79
-
80
-
81
-
82
-
83
-
84
-
85
-
86
-
87
-
88
-
89
-
90
-
91
-
92
-
93
-
94
-
95
-
96
-
97
-
98
-
99
-
100
 |
 |
