Dell P713W User's Guide - Page 40
Printing photos from a memory device using the printer software - wireless all in one
 |
View all Dell P713W manuals
Add to My Manuals
Save this manual to your list of manuals |
Page 40 highlights
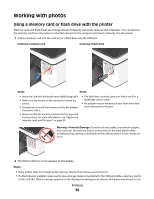
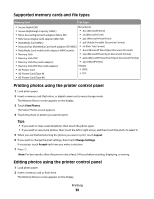
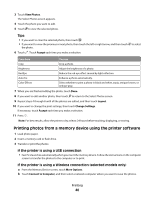
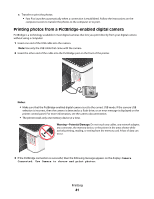
3 Touch View Photos. The Select Photos screen appears. 4 Touch the photo you want to edit. 5 Touch to view the selected photo. Tips: • If you want to clear the selected photo, then touch . • If you want to view the previous or next photo, then touch the left or right arrow, and then touch the photo. 6 Touch . Touch Accept each time you make a selection. to select From here You can Crop Brightness Red Eye Auto Fix Color Effects Crop a photo. Adjust the brightness of a photo. Reduce the red-eye effect caused by light reflection. Enhance a photo automatically. Select whether to print a photo in black and white, sepia, antique brown, or antique gray. 7 When you are finished editing the photo, touch Done. 8 If you want to edit another photo, then touch to return to the Select Photos screen. 9 Repeat steps 4 through 8 until all the photos are edited, and then touch Layout. 10 If you want to change the print settings, then touch Change Settings. If necessary, touch Accept each time you make a selection. 11 Press . Note: For best results, allow the prints to dry at least 24 hours before stacking, displaying, or storing. Printing photos from a memory device using the printer software 1 Load photo paper. 2 Insert a memory card or flash drive. 3 Transfer or print the photos: If the printer is using a USB connection • Fast Pics launches automatically when you insert the memory device. Follow the instructions on the computer screen to transfer the photos to the computer or to print. If the printer is using a Wireless connection (selected models only) a From the Memory Device screen, touch More Options. b Touch Connect to Computer, and then select a network computer where you want to save the photos. Printing 40
-
 1
1 -
2
-
3
-
4
-
5
-
6
-
7
-
8
-
9
-
10
-
11
-
12
-
13
-
14
-
15
-
16
-
17
-
18
-
19
-
20
-
21
-
22
-
23
-
24
-
25
-
26
-
27
-
28
-
29
-
30
-
31
-
32
-
33
-
34
-
 35
35 -
 36
36 -
 37
37 -
 38
38 -
 39
39 -
 40
40 -
 41
41 -
 42
42 -
 43
43 -
 44
44 -
 45
45 -
46
-
47
-
48
-
49
-
50
-
51
-
52
-
53
-
54
-
55
-
56
-
57
-
58
-
59
-
60
-
61
-
62
-
63
-
64
-
65
-
66
-
67
-
68
-
69
-
70
-
71
-
72
-
73
-
74
-
75
-
76
-
77
-
78
-
79
-
80
-
81
-
82
-
83
-
84
-
85
-
86
-
87
-
88
-
89
-
90
-
91
-
92
-
93
-
94
-
95
-
96
-
97
-
98
-
99
-
100
-
101
-
102
-
103
-
104
-
105
-
106
-
107
-
108
-
109
-
110
-
111
-
112
-
113
-
114
-
115
-
116
-
117
-
118
-
119
-
120
-
121
-
122
-
123
-
124
-
125
 |
 |