Dell PowerConnect J-EX4500 Hardware Guide - Page 145
Removing a Power Supply from a J-EX4500 Switch
 |
View all Dell PowerConnect J-EX4500 manuals
Add to My Manuals
Save this manual to your list of manuals |
Page 145 highlights
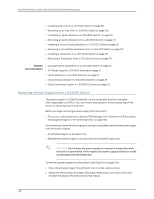
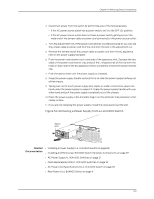
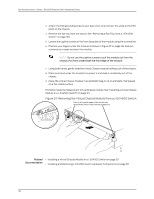
Chapter 14: Removing Switch Components 3. Disconnect power from the switch by performing one of the following tasks: • If the AC power source outlet has a power switch, set it to the OFF (0) position. • If the AC power source outlet does not have a power switch, gently pull out the male end of the jumper cable or power cord connected to the power source outlet. 4. Turn the adjustment nut of the power cord retainer counterclockwise till you can see the jumper cable or power cord. Pull the cord from the slot in the adjustment nut. 5. Remove the female end of the jumper cable or power cord from the AC appliance inlet on the power supply faceplate. 6. Push the power cord retainer clip to one side of the appliance inlet. Squeeze the two sides of the power cord retainer clip, and pull the L-shaped ends of the clip from the holes on each side of the AC appliance inlet to completely remove the power retainer clip. 7. Push the ejector lever until the power supply is unseated. 8. Grasp the power supply handle and pull firmly to slide the power supply halfway out of the chassis. 9. Taking care not to touch power supply pins, leads, or solder connections, place one hand under the power supply to support it. Grasp the power supply handle with your other hand and pull the power supply completely out of the chassis. 10. Place the power supply in the antistatic bag or on the antistatic mat placed on a flat, stable surface. 11. If you are not replacing the power supply, install the cover panel over the slot. Figure 54: Removing a Power Supply from a J-EX4500 Switch Ejector lever Related • Installing a Power Supply in a J-EX4500 Switch on page 88 Documentation • Installing and Removing J-EX4500 Switch Hardware Components on page 87 • AC Power Supply in J-EX4500 Switches on page 21 • Field-Replaceable Units in J-EX4500 Switches on page 18 • AC Power Cord Specifications for a J-EX4500 Switch on page 65 • Rear Panel of a J-EX4500 Switch on page 9 129 g021067
-
 1
1 -
2
-
3
-
4
-
5
-
6
-
7
-
8
-
9
-
10
-
11
-
12
-
13
-
14
-
15
-
16
-
17
-
18
-
19
-
20
-
21
-
22
-
23
-
24
-
25
-
26
-
27
-
28
-
29
-
30
-
31
-
32
-
33
-
34
-
35
-
36
-
37
-
38
-
39
-
40
-
41
-
42
-
43
-
44
-
45
-
46
-
47
-
48
-
49
-
50
-
51
-
52
-
53
-
54
-
55
-
56
-
57
-
58
-
59
-
60
-
61
-
62
-
63
-
64
-
65
-
66
-
67
-
68
-
69
-
70
-
71
-
72
-
73
-
74
-
75
-
76
-
77
-
78
-
79
-
80
-
81
-
82
-
83
-
84
-
85
-
86
-
87
-
88
-
89
-
90
-
91
-
92
-
93
-
94
-
95
-
96
-
97
-
98
-
99
-
100
-
101
-
102
-
103
-
104
-
105
-
106
-
107
-
108
-
109
-
110
-
111
-
112
-
113
-
114
-
115
-
116
-
117
-
118
-
119
-
120
-
121
-
122
-
123
-
124
-
125
-
126
-
127
-
128
-
129
-
130
-
131
-
132
-
133
-
134
-
135
-
136
-
137
-
138
-
139
-
 140
140 -
 141
141 -
 142
142 -
 143
143 -
 144
144 -
 145
145 -
 146
146 -
 147
147 -
 148
148 -
 149
149 -
 150
150 -
151
-
152
-
153
-
154
-
155
-
156
-
157
-
158
-
159
-
160
-
161
-
162
-
163
-
164
-
165
-
166
-
167
-
168
-
169
-
170
-
171
-
172
-
173
-
174
-
175
-
176
-
177
-
178
-
179
-
180
-
181
-
182
-
183
-
184
-
185
-
186
-
187
-
188
-
189
-
190
-
191
-
192
-
193
-
194
-
195
-
196
-
197
-
198
-
199
-
200
-
201
-
202
-
203
-
204
-
205
-
206
-
207
-
208
-
209
-
210
-
211
-
212
-
213
-
214
-
215
-
216
-
217
-
218
-
219
-
220
-
221
-
222
-
223
-
224
-
225
-
226
 |
 |