Dell PowerConnect J-EX4500 Hardware Guide - Page 98
Read General Safety Guidelines and Warnings for J-EX Series Switches
 |
View all Dell PowerConnect J-EX4500 manuals
Add to My Manuals
Save this manual to your list of manuals |
Page 98 highlights
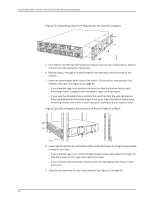
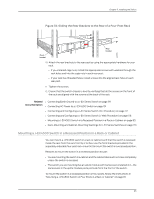
Dell PowerConnect J-Series J-EX4500 Ethernet Switch Hardware Guide NOTE: If you are mounting the switch on four posts, ensure that the rack is 21.5 in. through 31.5 in. deep if you will mount the switch flush with the rack front and that the rack is 23.5 in. through 32.5 in. deep if you will mount the switch 2 in. recessed from the rack front, thus ensuring that the protective earthing terminal is accessible through the opening in the rear bracket. Before mounting the switch on four posts in a rack: • Verify that the site meets the requirements described in "Site Preparation Checklist for J-EX4500 Switches" on page 53. • Place the rack in its permanent location, allowing adequate clearance for airflow and maintenance, and secure it to the building structure. • Read "General Safety Guidelines and Warnings for J-EX Series Switches" on page 159, with particular attention to "Chassis Lifting Guidelines for J-EX4500 Switches" on page 172. • Remove the switch from the shipping carton (see "Unpacking a J-EX4500 Switch" on page 76). • Have two persons available to mount the switch. One person will support the switch in a level position, and the second person will secure the switch to the rack. Ensure that you have the following parts and tools available: • Phillips (+) screwdriver, number 2 • Flat-blade screwdriver if you are installing the switch in a rack with square, nonthreaded holes • 12 flat-head M4x6-mm Phillips mounting screws (provided with the four-post rack-mount kit) • One pair of front brackets • One pair of rear brackets • 8 screws-and 8 cage nuts and washers if your rack requires them-to secure the chassis and the rear brackets to the rack (provided) CAUTION: If you are mounting multiple units on a rack, mount the heaviest unit at the bottom of the rack and mount the other units from the bottom of the rack to the top in decreasing order of the weight of the units. To mount the switch on four posts in a rack: 1. If your rack has unthreaded round or square holes: a. Determine the location on the rack where you want to mount the switch, and install 2 cage nuts in the appropriate holes in each rack post, front and rear. 82
-
 1
1 -
2
-
3
-
4
-
5
-
6
-
7
-
8
-
9
-
10
-
11
-
12
-
13
-
14
-
15
-
16
-
17
-
18
-
19
-
20
-
21
-
22
-
23
-
24
-
25
-
26
-
27
-
28
-
29
-
30
-
31
-
32
-
33
-
34
-
35
-
36
-
37
-
38
-
39
-
40
-
41
-
42
-
43
-
44
-
45
-
46
-
47
-
48
-
49
-
50
-
51
-
52
-
53
-
54
-
55
-
56
-
57
-
58
-
59
-
60
-
61
-
62
-
63
-
64
-
65
-
66
-
67
-
68
-
69
-
70
-
71
-
72
-
73
-
74
-
75
-
76
-
77
-
78
-
79
-
80
-
81
-
82
-
83
-
84
-
85
-
86
-
87
-
88
-
89
-
90
-
91
-
92
-
 93
93 -
 94
94 -
 95
95 -
 96
96 -
 97
97 -
 98
98 -
 99
99 -
 100
100 -
 101
101 -
 102
102 -
 103
103 -
104
-
105
-
106
-
107
-
108
-
109
-
110
-
111
-
112
-
113
-
114
-
115
-
116
-
117
-
118
-
119
-
120
-
121
-
122
-
123
-
124
-
125
-
126
-
127
-
128
-
129
-
130
-
131
-
132
-
133
-
134
-
135
-
136
-
137
-
138
-
139
-
140
-
141
-
142
-
143
-
144
-
145
-
146
-
147
-
148
-
149
-
150
-
151
-
152
-
153
-
154
-
155
-
156
-
157
-
158
-
159
-
160
-
161
-
162
-
163
-
164
-
165
-
166
-
167
-
168
-
169
-
170
-
171
-
172
-
173
-
174
-
175
-
176
-
177
-
178
-
179
-
180
-
181
-
182
-
183
-
184
-
185
-
186
-
187
-
188
-
189
-
190
-
191
-
192
-
193
-
194
-
195
-
196
-
197
-
198
-
199
-
200
-
201
-
202
-
203
-
204
-
205
-
206
-
207
-
208
-
209
-
210
-
211
-
212
-
213
-
214
-
215
-
216
-
217
-
218
-
219
-
220
-
221
-
222
-
223
-
224
-
225
-
226
 |
 |