Dell PowerConnect W-Airwave W-Airwave 7.4 User Guide - Page 45
screen. The user information you have con d appears on the AMP Setup > Users and the user
 |
View all Dell PowerConnect W-Airwave manuals
Add to My Manuals
Save this manual to your list of manuals |
Page 45 highlights
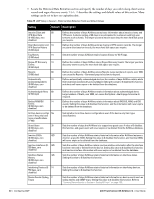
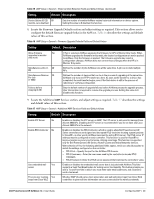
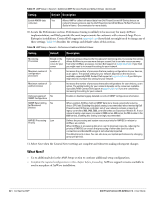
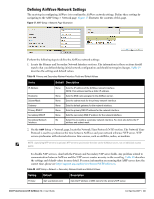
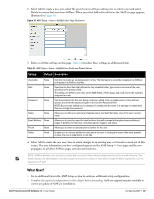
2. Select Add to create a new user, select the pencil icon to edit an existing user, or select a user and select Delete to remove that user from AirWave. When you select Add or the edit icon, the Add User page appears, illustrated in Figure 19. Figure 19 AMP Setup > Users > Add/Edit User Page Illustration 3. Enter or edit the settings on this page. Table 21 describes these settings in additional detail. Table 21 AMP Setup > Users > Add/Edit User Fields and Default Values Setting Default Description Username Role None None Password None Name None Email Address None Phone Notes None None Sets the username as an alphanumeric string. The Username is used when logging in to AirWave and appears in AirWave log files. Specifies the User Role that defines the Top viewable folder, type and access level of the user specified in the previous field. The admin user defines user roles on the AMP Setup > Roles page, and each user in the system is assigned to a role. Sets the password for the user being created or edited. Enter an alphanumeric string without spaces, and enter the password again in the Confirm Password field. NOTE: Because the default user's password is identical to the name, it is strongly recommended that you change this password. Allows you to define an optional and alphanumeric text field that takes note of the user's actual name. Allows you to specify a specific email address that will propagate throughout many additional pages in AirWave for that user, including reports, triggers, and alerts. Allows you to enter an optional phone number for the user. Enables you to cite any additional notes about the user, including the reason they were granted access, the user's department, or job title. 4. Select Add to create the new user, Save to retain changes to an existing user, or Cancel to cancel out of this screen. The user information you have configured appears on the AMP Setup > Users page and the user propagates to all other AirWave pages and relevant functions. NOTE: AirWave enables user roles to be created with access to folders within multiple branches of the overall hierarchy. This feature assists non-administrator users who support a subset of accounts or sites within a single AirWave deployment, such as help desk or IT staff. What Next? Go to additional tabs in the AMP Setup section to continue additional setup configurations. Complete the required configurations in this chapter before proceeding. AirWave support remains available to you for any phase of AirWave installation. Dell PowerConnect W-AirWave 7.4 | User Guide Configuring AMP | 45
-
 1
1 -
2
-
3
-
4
-
5
-
6
-
7
-
8
-
9
-
10
-
11
-
12
-
13
-
14
-
15
-
16
-
17
-
18
-
19
-
20
-
21
-
22
-
23
-
24
-
25
-
26
-
27
-
28
-
29
-
30
-
31
-
32
-
33
-
34
-
35
-
36
-
37
-
38
-
39
-
 40
40 -
 41
41 -
 42
42 -
 43
43 -
 44
44 -
 45
45 -
 46
46 -
 47
47 -
 48
48 -
 49
49 -
 50
50 -
51
-
52
-
53
-
54
-
55
-
56
-
57
-
58
-
59
-
60
-
61
-
62
-
63
-
64
-
65
-
66
-
67
-
68
-
69
-
70
-
71
-
72
-
73
-
74
-
75
-
76
-
77
-
78
-
79
-
80
-
81
-
82
-
83
-
84
-
85
-
86
-
87
-
88
-
89
-
90
-
91
-
92
-
93
-
94
-
95
-
96
-
97
-
98
-
99
-
100
-
101
-
102
-
103
-
104
-
105
-
106
-
107
-
108
-
109
-
110
-
111
-
112
-
113
-
114
-
115
-
116
-
117
-
118
-
119
-
120
-
121
-
122
-
123
-
124
-
125
-
126
-
127
-
128
-
129
-
130
-
131
-
132
-
133
-
134
-
135
-
136
-
137
-
138
-
139
-
140
-
141
-
142
-
143
-
144
-
145
-
146
-
147
-
148
-
149
-
150
-
151
-
152
-
153
-
154
-
155
-
156
-
157
-
158
-
159
-
160
-
161
-
162
-
163
-
164
-
165
-
166
-
167
-
168
-
169
-
170
-
171
-
172
-
173
-
174
-
175
-
176
-
177
-
178
-
179
-
180
-
181
-
182
-
183
-
184
-
185
-
186
-
187
-
188
-
189
-
190
-
191
-
192
-
193
-
194
-
195
-
196
-
197
-
198
-
199
-
200
-
201
-
202
-
203
-
204
-
205
-
206
-
207
-
208
-
209
-
210
-
211
-
212
-
213
-
214
-
215
-
216
-
217
-
218
-
219
-
220
-
221
-
222
-
223
-
224
-
225
-
226
-
227
-
228
-
229
-
230
-
231
-
232
-
233
-
234
-
235
-
236
-
237
-
238
-
239
-
240
-
241
-
242
-
243
-
244
-
245
-
246
-
247
-
248
-
249
-
250
-
251
-
252
-
253
-
254
-
255
-
256
-
257
-
258
-
259
-
260
-
261
-
262
-
263
-
264
-
265
-
266
-
267
-
268
-
269
-
270
-
271
-
272
-
273
-
274
-
275
-
276
-
277
-
278
-
279
-
280
-
281
-
282
-
283
-
284
-
285
-
286
-
287
-
288
-
289
-
290
-
291
-
292
-
293
-
294
-
295
-
296
-
297
-
298
-
299
-
300
-
301
-
302
-
303
-
304
-
305
-
306
-
307
-
308
-
309
-
310
 |
 |
