Dell PowerConnect W Clearpass 100 Software 3.9.1 Release Notes - Page 15
Guest Management
 |
View all Dell PowerConnect W Clearpass 100 Software manuals
Add to My Manuals
Save this manual to your list of manuals |
Page 15 highlights
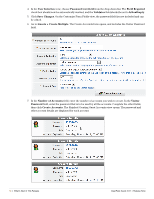
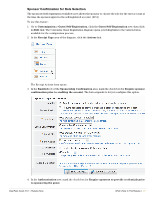
Guest Management Single Password for Multiple Accounts Supported Support was added for the password field on the Create Multiple Guest Accounts form (create_multi). After you customize this form to include the password field, you can create multiple accounts that have the same password. (2291) To use this feature: 1. Go to Customization > Forms & Views, click the create_multi row, then click its Edit Fields link. The Customize Form Fields view opens, showing a list of form fields and their descriptions. At this point, the Password field is not listed because the create_multi form has not yet been customized to include it. You will create it for the form in the next step. 2. Click on any field in the list to expand a row, then click the Insert After link. The Customize Form Field form opens. 3. In the Field Name row, choose password from the drop-down list, and mark the Enable this field check box in the Field row. You may also enter a number in the Rank field to sort the password field on the form. ClearPass Guest 3.9.1 | Release Note What's New in This Release | 15
-
 1
1 -
2
-
3
-
4
-
5
-
6
-
7
-
8
-
9
-
 10
10 -
 11
11 -
 12
12 -
 13
13 -
 14
14 -
 15
15 -
 16
16 -
 17
17 -
 18
18 -
 19
19 -
 20
20 -
21
-
22
-
23
-
24
-
25
-
26
-
27
-
28
-
29
-
30
-
31
-
32
-
33
-
34
-
35
-
36
-
37
-
38
 |
 |