Dell PowerEdge 1650 Rack Installation Guide - Page 10
Marking the Rack, To mark the rack, perform the following steps
 |
View all Dell PowerEdge 1650 manuals
Add to My Manuals
Save this manual to your list of manuals |
Page 10 highlights
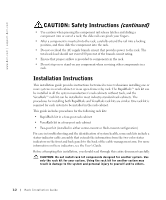
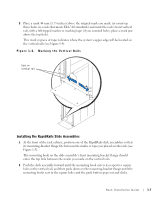
www.dell.com | support.dell.com Marking the Rack You must allow 1 U (44 mm, or 1.75 inches) of vertical space for each system you install in the rack. Rack cabinets that meet EIA-310 standards have an alternating pattern of three holes per rack unit with center-to-center hole spacing (beginning at the top hole of a 1-U space) of 15.9 mm, 15.9 mm, and 12.7 mm (0.625 inch, 0.625 inch, and 0.5 inch) for the front and rear vertical rails (see Figure 1-3). Rack cabinets may have round or square holes. NOTE: The vertical rails may be marked by horizontal lines and numbers in 1-U increments. If you wish, you can make a note of the number marking on the rack's vertical rail. It is not necessary to mark or place tape on the rack. If you choose this method, skip ahead to the procedure "Installing the RapidRails Slide Assemblies." Figure 1-3. One Rack Unit 1 U (44 mm or 1.75 inches) 12.7 mm (0.5 inch) 15.9 mm (0.625 inch) 15.9 mm (0.625 inch) 12.7 mm (0.5 inch) CAUTION: If you are installing more than one system, install the slide assemblies so that the first system is installed in the lowest available position in the rack. To mark the rack, perform the following steps: 1 Place a mark on the rack's front vertical rails where you want to locate the bottom of the system you are installing in the rack cabinet. The bottom of each 1-U space is at the middle of the narrowest metal area between holes (marked with a horizontal line on some rack cabinets-see Figure 1-3). 1-6 Rack Installation Guide
-
 1
1 -
2
-
3
-
4
-
 5
5 -
 6
6 -
 7
7 -
 8
8 -
 9
9 -
 10
10 -
 11
11 -
 12
12 -
 13
13 -
 14
14 -
 15
15 -
16
-
17
-
18
-
19
-
20
-
21
-
22
-
23
-
24
-
25
-
26
-
27
-
28
-
29
-
30
-
31
-
32
-
33
-
34
-
35
-
36
-
37
-
38
-
39
-
40
-
41
-
42
-
43
-
44
-
45
-
46
-
47
-
48
-
49
-
50
-
51
-
52
-
53
-
54
-
55
-
56
-
57
-
58
-
59
-
60
-
61
-
62
-
63
-
64
-
65
-
66
-
67
-
68
-
69
-
70
-
71
-
72
-
73
-
74
-
75
-
76
-
77
-
78
-
79
-
80
-
81
-
82
-
83
-
84
-
85
-
86
-
87
-
88
-
89
-
90
-
91
-
92
-
93
-
94
-
95
-
96
-
97
-
98
-
99
-
100
-
101
-
102
-
103
-
104
-
105
-
106
-
107
-
108
-
109
-
110
-
111
-
112
-
113
-
114
-
115
-
116
-
117
-
118
-
119
-
120
-
121
-
122
-
123
-
124
-
125
-
126
-
127
-
128
-
129
-
130
-
131
-
132
-
133
-
134
-
135
-
136
-
137
-
138
-
139
-
140
-
141
-
142
-
143
-
144
-
145
-
146
-
147
-
148
-
149
-
150
-
151
-
152
-
153
-
154
-
155
-
156
-
157
-
158
-
159
-
160
-
161
-
162
-
163
-
164
-
165
-
166
-
167
-
168
-
169
-
170
-
171
-
172
-
173
-
174
-
175
-
176
-
177
 |
 |