Dell PowerEdge 1650 Rack Installation Guide - Page 20
Replacing the Rack Doors, Two-Post Rack Installation, Recommended Tools and Supplies - drivers
 |
View all Dell PowerEdge 1650 manuals
Add to My Manuals
Save this manual to your list of manuals |
Page 20 highlights
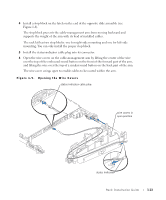
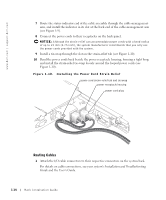
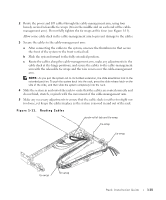
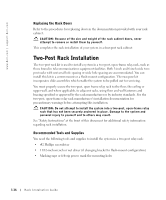
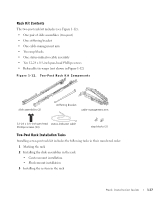
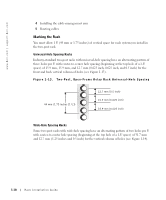
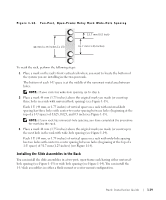
www.dell.com | support.dell.com Replacing the Rack Doors Refer to the procedures for replacing doors in the documentation provided with your rack cabinet. CAUTION: Because of the size and weight of the rack cabinet doors, never attempt to remove or install them by yourself. This completes the rack installation of your system in a four-post rack cabinet. Two-Post Rack Installation The two-post rack kit is used to install a system in a two-post, open-frame relay rack, such as those found in telecommunications equipment facilities. Both 3-inch and 6-inch wide twopost racks with universal hole spacing or wide hole spacing are accommodated. You can install this kit in a center-mount or a flush-mount configuration. The two-post kit incorporates slide assemblies which enable the system to be pulled out for servicing. You must properly secure the two-post, open frame relay rack to the floor, the ceiling or upper wall, and where applicable, to adjacent racks, using floor and wall fasteners and bracing specified or approved by the rack manufacturer or by industry standards. See the two-post, open-frame relay rack manufacturer's installation documentation for precautionary warnings before attempting this installation. CAUTION: Do not attempt to install the system into a two-post, open-frame relay rack that has not been securely anchored in place. Damage to the system and personal injury to yourself and to others may result. See "Safety Instructions" at the front of this document for additional safety information regarding rack installation. Recommended Tools and Supplies You need the following tools and supplies to install the system in a two-post relay rack: • #2 Phillips screwdriver • 11/32-inch wrench or nut driver (if changing bracket to flush-mount configuration) • Masking tape or felt-tip pen to mark the mounting holes 1-16 Rack Installation Guide
-
 1
1 -
2
-
3
-
4
-
5
-
6
-
7
-
8
-
9
-
10
-
11
-
12
-
13
-
14
-
 15
15 -
 16
16 -
 17
17 -
 18
18 -
 19
19 -
 20
20 -
 21
21 -
 22
22 -
 23
23 -
 24
24 -
 25
25 -
26
-
27
-
28
-
29
-
30
-
31
-
32
-
33
-
34
-
35
-
36
-
37
-
38
-
39
-
40
-
41
-
42
-
43
-
44
-
45
-
46
-
47
-
48
-
49
-
50
-
51
-
52
-
53
-
54
-
55
-
56
-
57
-
58
-
59
-
60
-
61
-
62
-
63
-
64
-
65
-
66
-
67
-
68
-
69
-
70
-
71
-
72
-
73
-
74
-
75
-
76
-
77
-
78
-
79
-
80
-
81
-
82
-
83
-
84
-
85
-
86
-
87
-
88
-
89
-
90
-
91
-
92
-
93
-
94
-
95
-
96
-
97
-
98
-
99
-
100
-
101
-
102
-
103
-
104
-
105
-
106
-
107
-
108
-
109
-
110
-
111
-
112
-
113
-
114
-
115
-
116
-
117
-
118
-
119
-
120
-
121
-
122
-
123
-
124
-
125
-
126
-
127
-
128
-
129
-
130
-
131
-
132
-
133
-
134
-
135
-
136
-
137
-
138
-
139
-
140
-
141
-
142
-
143
-
144
-
145
-
146
-
147
-
148
-
149
-
150
-
151
-
152
-
153
-
154
-
155
-
156
-
157
-
158
-
159
-
160
-
161
-
162
-
163
-
164
-
165
-
166
-
167
-
168
-
169
-
170
-
171
-
172
-
173
-
174
-
175
-
176
-
177
 |
 |