Dell PowerEdge M420 Dell PowerEdge M520 Systems Owner's Manual - Page 45
Hard Drive Installation Guidelines, Removing A Hard Drive
 |
View all Dell PowerEdge M420 manuals
Add to My Manuals
Save this manual to your list of manuals |
Page 45 highlights
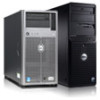
• Hard drives are supplied in special hot-swappable drive carriers that fit in the hard-drive bays. • SSD/SAS/SATA hard drives cannot be mixed within a blade. Hard Drive Installation Guidelines For a single hard-drive configuration, a hard-drive blank must be installed in the other drive bay to maintain proper cooling airflow. Removing A Hard Drive NOTE: Not all operating systems support hot-swappable drive installation. See the documentation supplied with your operating system. 1. Take the hard drive offline and wait until the hard-drive indicator codes on the drive carrier signal that the drive may be removed safely. When all indicators are off, the drive is ready for removal. See your operating system documentation for more information on taking the hard drive offline. 2. Open the hard-drive carrier handle to release the drive. 3. Slide the hard drive out until it is free of the drive bay. If you are permanently removing the hard drive, install a blank insert. Figure 15. Removing and Installing a Hard Drive 1. release button 2. hard drive 3. hard-drive connector (on backplane) 4. hard-drive carrier handle 45
-
 1
1 -
2
-
3
-
4
-
5
-
6
-
7
-
8
-
9
-
10
-
11
-
12
-
13
-
14
-
15
-
16
-
17
-
18
-
19
-
20
-
21
-
22
-
23
-
24
-
25
-
26
-
27
-
28
-
29
-
30
-
31
-
32
-
33
-
34
-
35
-
36
-
37
-
38
-
39
-
 40
40 -
 41
41 -
 42
42 -
 43
43 -
 44
44 -
 45
45 -
 46
46 -
 47
47 -
 48
48 -
 49
49 -
 50
50 -
51
-
52
-
53
-
54
-
55
-
56
-
57
-
58
-
59
-
60
-
61
-
62
-
63
-
64
-
65
-
66
-
67
-
68
-
69
-
70
-
71
-
72
-
73
-
74
-
75
-
76
-
77
-
78
-
79
-
80
-
81
-
82
-
83
-
84
-
85
-
86
-
87
-
88
-
89
-
90
-
91
-
92
-
93
-
94
-
95
-
96
-
97
-
98
-
99
-
100
-
101
-
102
-
103
-
104
-
105
-
106
-
107
-
108
-
109
-
110
-
111
-
112
-
113
-
114
-
115
-
116
-
117
-
118
-
119
-
120
-
121
-
122
-
123
-
124
-
125
-
126
-
127
-
128
-
129
 |
 |
