Dell PowerEdge R420 Owner's Manual - Page 115
Disabling A Forgotten Password, A1, A4, A2, A5, A3, A6
 |
View all Dell PowerEdge R420 manuals
Add to My Manuals
Save this manual to your list of manuals |
Page 115 highlights
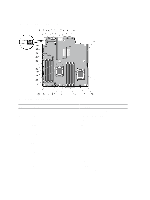
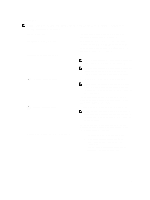
Item Connector 15 B1, B4, B2, B5, B3, B6 16 FAN4 17 FAN3 18 PWR_CONN_1 19 FAN2 20 A1, A4, A2, A5, A3, A6 21 BP_SIG 22 PWR_CONN_2 23 CPU1 24 PDB_CONN 25 BATTERY 26 CTRL_PNL_MB 27 SATA_A-D 28 SATA_E 29 SAS_A 30 FP_USB 31 IDSDM 32 SAS_B Description Memory module sockets Cooling fan connector Cooling fan connector 8-pin power connector Cooling fan connector Memory module sockets Backplane signal connector 24-pin power connector Processor socket 1 Power distribution board connector Battery connector Control panel interface connector SATA connector A-D SATA connector E SAS connector A Front panel USB connector Internal Dual SD Module connector SAS connector B Disabling A Forgotten Password The system's software security features include a system password and a setup password. The password jumper enables these password features or disables them and clears any password(s) currently in use. CAUTION: See "Protecting Against Electrostatic Discharge" in the safety instructions that came with the system. 1. Turn off the system, including any attached peripherals, and disconnect the system from the electrical outlet. 2. Open the system. 3. Remove the jumper plug from the password jumper. 4. Close the system. The existing passwords are not disabled (erased) until the system boots with the password jumper plug removed. However, before you assign a new system and/or setup password, you must install the jumper plug. NOTE: If you assign a new system and/or setup password with the jumper plug still removed, the system disables the new password(s) the next time it boots. 5. Turn off the system, including any attached peripherals, and disconnect the system from the electrical outlet. 6. Open the system. 7. Install the jumper plug on the password jumper. 8. Close the system. 9. Assign a new system and/or setup password. 115
-
 1
1 -
2
-
3
-
4
-
5
-
6
-
7
-
8
-
9
-
10
-
11
-
12
-
13
-
14
-
15
-
16
-
17
-
18
-
19
-
20
-
21
-
22
-
23
-
24
-
25
-
26
-
27
-
28
-
29
-
30
-
31
-
32
-
33
-
34
-
35
-
36
-
37
-
38
-
39
-
40
-
41
-
42
-
43
-
44
-
45
-
46
-
47
-
48
-
49
-
50
-
51
-
52
-
53
-
54
-
55
-
56
-
57
-
58
-
59
-
60
-
61
-
62
-
63
-
64
-
65
-
66
-
67
-
68
-
69
-
70
-
71
-
72
-
73
-
74
-
75
-
76
-
77
-
78
-
79
-
80
-
81
-
82
-
83
-
84
-
85
-
86
-
87
-
88
-
89
-
90
-
91
-
92
-
93
-
94
-
95
-
96
-
97
-
98
-
99
-
100
-
101
-
102
-
103
-
104
-
105
-
106
-
107
-
108
-
109
-
 110
110 -
 111
111 -
 112
112 -
 113
113 -
 114
114 -
 115
115 -
 116
116 -
 117
117 -
 118
118 -
 119
119 -
 120
120 -
121
-
122
-
123
-
124
-
125
-
126
-
127
-
128
-
129
-
130
-
131
-
132
-
133
-
134
-
135
-
136
-
137
 |
 |