Dell PowerEdge R640 Deploying the 55TB Data Warehouse Fast Track Reference Arc - Page 19
Install and con SQL Server 2017 Enterprise Edition
 |
View all Dell PowerEdge R640 manuals
Add to My Manuals
Save this manual to your list of manuals |
Page 19 highlights
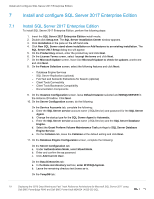
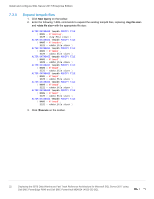
Install and configure SQL Server 2017 Enterprise Edition 7 Install and configure SQL Server 2017 Enterprise Edition 7.1 Install SQL Server 2017 Enterprise Edition To install SQL Server 2017 Enterprise Edition, perform the following steps: 1. Insert the SQL Server 2017 Enterprise Edition install media. 2. Double-click Setup.exe. The SQL Server Installation Center window appears. 3. Click Installation in the pane on the left-hand side. 4. Click New SQL Server stand-alone installation or Add features to an existing installation. The SQL Server 2017 Setup dialog box will appear. 5. On the Product Key screen, enter the product key and click Next. 6. On the License Terms screen, select I accept the terms and click Next. 7. On the Microsoft Update screen, leave Use Microsoft Update to check for updates unselected and click Next. 8. On the Feature Selection screen, select the following features and click Next: - Database Engine Services - SQL Server Replication (optional) - Full-Text and Semantic Extractions for Search (optional) - Client Tools Connectivity - Client Tools Backwards Compatibility - Documentation Components 9. On the Instance Configuration screen, leave Default Instance selected and MSSQLSERVER in the Instance ID textbox. Click Next. 10. On the Server Configuration screen, do the following: On the Service Accounts tab, complete the following: a. Enter the SQL Server service account name (.\SQLService) and password for the SQL Server Agent. b. Change the startup type for the SQL Server Agent to Automatic. c. Enter the SQL Server service account name (.\SQLService) and the SQL Server Database Engine. d. Select the Grant Perform Volume Maintenance Task privilege to SQL Server Database Engine Service. e. On the Collation tab, leave the Collation at the default setting and click Next. 11. On the Database Engine Configuration screen, complete the following: On the Server Configuration tab: a. Under Authentication Mode, select Mixed Mode. b. Enter and confirm the sa password. c. Click Add Current User. On the Data Directories tab: a. In the Data root directory text box, enter M:\ft\SQLSystem. b. Leave the remaining directory text boxes as-is. On the TempDB tab: 19 Deploying the 55TB Data Warehouse Fast Track Reference Architecture for Microsoft SQL Server 2017 using Dell EMC PowerEdge R640 and Dell EMC PowerVault ME4024 | 4023-CD-SQL
-
 1
1 -
2
-
3
-
4
-
5
-
6
-
7
-
8
-
9
-
10
-
11
-
12
-
13
-
 14
14 -
 15
15 -
 16
16 -
 17
17 -
 18
18 -
 19
19 -
 20
20 -
 21
21 -
 22
22 -
 23
23 -
 24
24
 |
 |
