Dell PowerEdge XE2420 EMC PowerEdge RAID Controller S140 Users Guide - Page 36
Assigning the global hot spare, Unassign a global hot spare, Assigning the dedicated hot spare
 |
View all Dell PowerEdge XE2420 manuals
Add to My Manuals
Save this manual to your list of manuals |
Page 36 highlights
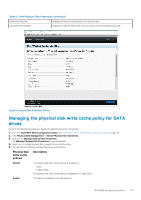
Physical disk write cache policies Disable Description The feature is disabled on the disk selected. 6. Click Apply to save the changes made. NOTE: Ensure that you change the physical disk write cache policy of a global hot spare disk after rebuild to the write cache policy of the last configured virtual disk. NOTE: In the View Virtual Disk Properties screen, ensure that the physical disk write cache setting is consistent across the physical disk associated with the virtual disk. NOTE: If you have Linux RAID configured on the system, you cannot modify the physical disk write cache policy feature settings. NOTE: For more information about the physical disk write cache behavior, see the Troubleshooting your system on page 42 section. Assigning the global hot spare 1. Enter the Dell PERC S140 Configuration Utility. See Entering the DELL PERC S140 Configuration Utility on page 26. 2. Click Physical Disk Management > Select Physical Disk Operations. 3. Select the physical disk that is in the ready state from the drop-down menu. 4. Click the link Assign Global Hot Spares. NOTE: A global hot spare disk cannot be created if you have Linux RAID configured on the system. Unassign a global hot spare NOTE: Unassigning a hotspare may place the data at risk in the event of a disk failure. 1. Enter the Dell PERC S140 Configuration Utility. See Entering the DELL PERC S140 Configuration Utility on page 26. 2. Click Physical Disk Management > Select Physical Disk Operations. 3. Select a global hot spare disk from the drop-down menu. 4. Click the link Unassign Hot Spare. Confirmation screen appears. 5. Click Yes to confirm. Assigning the dedicated hot spare WARNING: Assigning a disk as a hot spare will cause the data on the disk to be permanently deleted. NOTE: After a hot spare rebuild, creating new partial virtual disk on the same Linux RAID disk is not supported. 1. Enter the Dell PERC S140 Configuration Utility. See Entering the DELL PERC S140 Configuration Utility on page 26. 2. Click Virtual Disk Management > Manage Virtual Disk Properties. 3. Select the virtual disk that is in the ready state from the drop-down menu. 4. Click Manage Dedicated Hot Spares 5. Select the physical disk that you want to be assigned as a dedicated hot-spare disk. 6. Click the link Add Hot Spare Disk. Confirmation screen appears. 7. Select Confirm and click YES to complete the dedicated hot spare disk assignment. 36 UEFI RAID configuration utility
-
 1
1 -
2
-
3
-
4
-
5
-
6
-
7
-
8
-
9
-
10
-
11
-
12
-
13
-
14
-
15
-
16
-
17
-
18
-
19
-
20
-
21
-
22
-
23
-
24
-
25
-
26
-
27
-
28
-
29
-
30
-
 31
31 -
 32
32 -
 33
33 -
 34
34 -
 35
35 -
 36
36 -
 37
37 -
 38
38 -
 39
39 -
 40
40 -
 41
41 -
42
-
43
-
44
-
45
-
46
-
47
-
48
-
49
-
50
-
51
-
52
-
53
 |
 |
