Dell PowerVault 120T DDS4 User Guide - Page 23
Slide Stopper, Write Protect, Magazine Index Label, Slide Stopper, Write Protect
 |
View all Dell PowerVault 120T DDS4 manuals
Add to My Manuals
Save this manual to your list of manuals |
Page 23 highlights
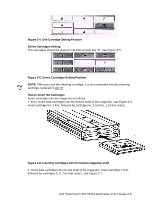
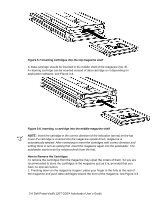
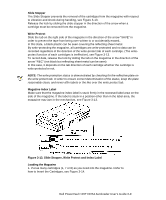
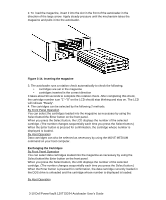
Slide Stopper The Slide Stopper prevents the removal of the cartridges from the magazine with respect to vibration and shock during handling, see Figure 3-13. Release the lock by sliding the slide stopper in the direction of the arrow when a cartridge must be removed from the magazine. Write Protect Slide the tab on the right side of the magazine in the direction of the arrow "SAVE" in order to prevent the tape from being over-written to or accidentally erased,. In this state, a black plastic can be seen covering the reflecting sheet metal. By write-protecting the magazine, all cartridges are write-protected and no data can be recorded regardless of the direction of the write-protect tab of each cartridge. (The writeprotect function of each cartridges is ineffective), see Figure 3-13. To record data, release the lock by sliding the tab on the magazine in the direction of the arrow "REC" (not black but reflecting sheet metal can be seen) In this case, it depends on the tab direction of each cartridge whether the cartridge is write-protected or not. NOTE: The write protection status is demonstrated by checking for the reflective plate on the write protect tab. In order to ensure correct determination of the status, keep the plate reasonably clean, and never affix labels or the like over the write protect tab. Magazine Index Label Make sure that the magazine index label is stuck firmly in the recessed label area on the side of the magazine. If the label is stuck in a position other than in the label area, the magazine may jam in the mechanism, see Figure 3-13. Figure 3-13. Slide Stopper, Write Protect and Index Label Loading the Magazine 1. Put as many cartridges (1, 7 or 8) as you need into the magazine. Refer to how to Insert the Cartridges, see Figure 3-14. Dell PowerVault 120T DDS4 Autoloader User's Guide 3-9
-
 1
1 -
2
-
3
-
4
-
5
-
6
-
7
-
8
-
9
-
10
-
11
-
12
-
13
-
14
-
15
-
16
-
17
-
 18
18 -
 19
19 -
 20
20 -
 21
21 -
 22
22 -
 23
23 -
 24
24 -
 25
25 -
 26
26 -
 27
27 -
 28
28 -
29
-
30
-
31
-
32
-
33
-
34
-
35
-
36
-
37
-
38
-
39
-
40
-
41
-
42
-
43
-
44
-
45
-
46
-
47
-
48
-
49
-
50
-
51
-
52
-
53
 |
 |
