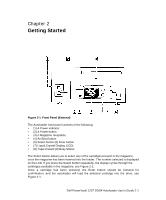
Dell PowerVault 120T DDS4 User Guide - Page 9
External Power/SCSI Connection/Setting SCSI ID - drive
 |
View all Dell PowerVault 120T DDS4 manuals
Add to My Manuals
Save this manual to your list of manuals |
Page 9 highlights
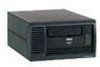
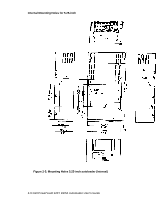
The Eject Button The Eject button starts the unload process. The drive unloads any currently loaded cartridge, and the loader mechanism returns it to the magazine. The magazine is then ejected, see Figure 2-1. NOTE: The host can disable the Eject button by sending a SCSI PREVENT MEDIA REMOVAL command. The Front Panel Liquid Crystal Display Displays autoloader function and status, Figure 2-1. Power Button (External Only) Press to turn autoloader on or off. External Power/SCSI Connection/Setting SCSI ID Figure 2-2. Rear Panel (External) • (1) Rotary Selector Switch for setting SCSI ID • (2) Cooling Fan • (3) AC In Connector • (4) Ground (GND) Terminal • (5) SCSI Connector 2-2 Dell PowerVault 120T DDS4 Autoloader User's Guide
-
 1
1 -
2
-
3
-
 4
4 -
 5
5 -
 6
6 -
 7
7 -
 8
8 -
 9
9 -
 10
10 -
 11
11 -
 12
12 -
 13
13 -
 14
14 -
15
-
16
-
17
-
18
-
19
-
20
-
21
-
22
-
23
-
24
-
25
-
26
-
27
-
28
-
29
-
30
-
31
-
32
-
33
-
34
-
35
-
36
-
37
-
38
-
39
-
40
-
41
-
42
-
43
-
44
-
45
-
46
-
47
-
48
-
49
-
50
-
51
-
52
-
53
 |
 |

2-2 Dell PowerVault 120T DDS4 Autoloader User's Guide
The Eject Button
The Eject button starts the unload process. The drive unloads any currently loaded
cartridge, and the loader mechanism returns it to the magazine. The magazine is then
ejected, see Figure 2-1.
NOTE:
The host can disable the Eject button by sending a SCSI PREVENT MEDIA
REMOVAL command.
The Front Panel Liquid Crystal Display
Displays autoloader function and status, Figure 2-1.
Power Button (External Only)
Press to turn autoloader on or off.
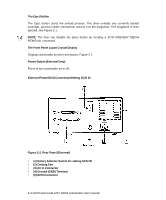
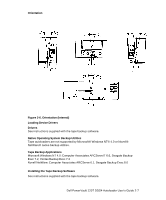
External Power/SCSI Connection/Setting SCSI ID
Figure 2-2. Rear Panel (External)
•
(1) Rotary Selector Switch for setting SCSI ID
•
(2) Cooling Fan
•
(3) AC In Connector
•
(4) Ground (GND) Terminal
•
(5) SCSI Connector