Dell PowerVault 700N Dell PowerVault NAS Solution iSCSI Deployment Guide - Page 26
Configuring iSCSI LUNs, Disk Access-Mount Read/Write Provision of Read/Write access of
 |
View all Dell PowerVault 700N manuals
Add to My Manuals
Save this manual to your list of manuals |
Page 26 highlights
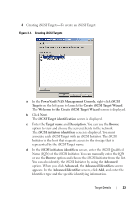
• Create Snapshot-You can take a snapshot of the virtual disk contents at any given instance. • Disk Access-Mount Read/Write (Provision of Read/Write access of the virtual disk by mounting it as a volume in the PowerVault NAS storage system. Mounted virtual disk appears as a local disk). CAUTION: Before mounting the virtual disk, disconnect all iSCSI Targets using the same virtual disk. Failure to do so can cause data corruption. NOTE: Load balancing and failover is possible by using Microsoft MPIO support or Multiple Connections per Session (MC/S). Currently, only the MPIO option is supported with PowerVault NAS storage solution configured with 3.2 iSCSI Target and Microsoft iSCSI Initiator version 2.06 or later. The MC/S option is not supported with PowerVault NAS storage system. Configuring iSCSI LUNs 1 From Disk Management, configure the iSCSI Target device. Go to the iSCSI Initiator host and click Start → Control Panel → Administrative tools → Computer Management→ Disk Management. In the right pane, the iSCSI disk is displayed as Unknown Not Initialized and Unallocated. 2 The Welcome to the Initialize and Convert Disk Wizard option appears. Run the Initialize and Convert Disk Wizard. a Retain the default settings and select Next in all screens. b The Completing the Initialize and Convert Disk Wizard screen appears. Click Finish. NOTE: Dynamic disks are not supported with iSCSI configuration. 3 Go to Disk Management. The Unallocated iSCSI disk is now identified as Basic and Unallocated. Right-click the iSCSI disk and select New Partition.... a The New Partition Wizard is launched. Click Next. b In the Select Partition Type screen, select the Partition Type as Primary Partition. Click Next. c In the Specify Partition size screen, specify the partition size. Click Next. 26 Target Details
-
 1
1 -
2
-
3
-
4
-
5
-
6
-
7
-
8
-
9
-
10
-
11
-
12
-
13
-
14
-
15
-
16
-
17
-
18
-
19
-
20
-
 21
21 -
 22
22 -
 23
23 -
 24
24 -
 25
25 -
 26
26 -
 27
27 -
 28
28 -
 29
29 -
 30
30 -
 31
31 -
32
-
33
-
34
-
35
-
36
-
37
-
38
-
39
-
40
-
41
-
42
-
43
-
44
-
45
-
46
-
47
-
48
-
49
-
50
-
51
-
52
-
53
-
54
-
55
-
56
 |
 |
