Dell PowerVault 700N Dell PowerVault NAS Solution iSCSI Deployment Guide - Page 48
Properties Tab, Installing and Configuring iSNS Server
 |
View all Dell PowerVault 700N manuals
Add to My Manuals
Save this manual to your list of manuals |
Page 48 highlights
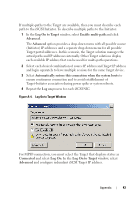
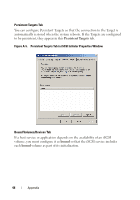
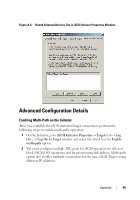
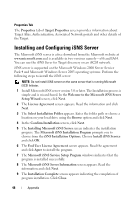
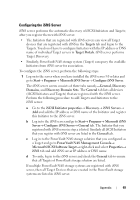
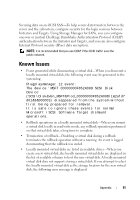
Properties Tab The Properties tab of Target Properties screen provides information about Target Alias, Authentication, Associated Network portals and other details of the Target. Installing and Configuring iSNS Server The Microsoft iSNS server is a free download from the Microsoft website at www.microsoft.com and is available in two versions namely-x86 and IA64. You can use the iSNS Sever for Target discovery on an iSCSI network. iSNS server is supported on the Microsoft Windows 2000 Server Service Pack 4 and Microsoft Windows Server 2003 operating systems. Perform the following steps to install the iSNS server: NOTE: Do not install iSNS server on the same server that is running Microsoft iSCSI Initiator. 1 Install Microsoft iSNS server version 3.0 or later. The Installation process is simple and is wizard-based. In the Welcome to the Microsoft iSNS Server Setup Wizard screen, click Next. 2 The License Agreement screen appears. Read the information and click Next. 3 The Select Installation Folder appears. Enter the folder path or choose a location on your local drive using the Browse option and click Next. 4 In the Confirm Installation screen, click Next. 5 The Installing Microsoft iSNS Server screen indicates the installation progress. The Microsoft iSNS Installation Program prompts you to choose from the iSNS Installation Options. Choose Install iSNS Service and click OK. 6 The End User License Agreement screen appears. Read the agreement and click Agree to install the program. 7 The Microsoft iSNS Service Setup Program windows indicates that the program is installed successfully. 8 The Microsoft iSNS Server Information screen appears. Read the information and click Next. 9 The Installation Complete screen appears indicating the completion of program installation. Click Close. 48 Appendix
-
 1
1 -
2
-
3
-
4
-
5
-
6
-
7
-
8
-
9
-
10
-
11
-
12
-
13
-
14
-
15
-
16
-
17
-
18
-
19
-
20
-
21
-
22
-
23
-
24
-
25
-
26
-
27
-
28
-
29
-
30
-
31
-
32
-
33
-
34
-
35
-
36
-
37
-
38
-
39
-
40
-
41
-
42
-
 43
43 -
 44
44 -
 45
45 -
 46
46 -
 47
47 -
 48
48 -
 49
49 -
 50
50 -
 51
51 -
 52
52 -
 53
53 -
54
-
55
-
56
 |
 |