Dell PowerVault TL2000 Dell Model TL2000/TL4000 Tape Library- User's Guide - Page 174
CARTRIDGE MOVEMENT PROBLEMS, Manage Library - incompatible magazine
 |
View all Dell PowerVault TL2000 manuals
Add to My Manuals
Save this manual to your list of manuals |
Page 174 highlights
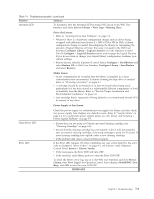
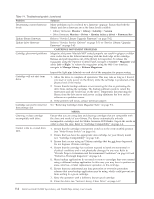
Table 7-1. Troubleshooting table (continued) Problem Solution Determining current firmware levels Many problems can be resolved by a firmware upgrade. Ensure that both the library and drive firmware are at the latest levels available. v Library firmware: Monitor → Library → Identity → Version v Drive firmware: Monitor → Drives → Identity (select a drive) → Firmware Rev Update library firmware Refer to "Service Library: Upgrade Firmware" on page 5-62. Update drive firmware Refer to "Service: Service (Drives)" on page 5-31 or "Service Library: Upgrade Firmware" on page 5-62. CARTRIDGE MOVEMENT PROBLEMS Cartridge placement problems Magazine slot prism fiducials NOT seated properly can result in gripper or slider error codes due to the fiducial interfering with the back edge of the cartridge. Release and pull magazines out of the library for inspection. To release the magazines using the Operator Control Panel, navigate to Control → Magazine and select Left or Right. To release the magazines using the Web User Interface, navigate to Manage Library → Release Magazines. Cartridge will not eject from drive Cartridge can not be removed from storage slot Cleaning or data cartridge incompatible with drive. Cannot write to or read from tape. Inspect the light pipe fiducials on each slot of the magazine for proper seating. 1. Allow the drive to complete all operations. This may take as long as 1 hour if you reset or cycle power on the library while the cartridge is positioned at the physical end of the media. 2. Ensure that the backup software is not reserving the slot or preventing the drive from ejecting the cartridge. The backup software needs to cancel the reservation and any hold it has on the drive. Temporarily disconnecting the library from the host server and power cycling eliminates the host and its software as a problem source. 3. If the problem still exists, contact technical support. See "Removing Cartridges from Magazine Slots" on page 9-1. MEDIA Ensure that you are using data and cleaning cartridges that are compatible with the drive and model of your library. The library automatically unloads incompatible cartridges and the Media Attention LED flashes. Export the media in order to clear the state. Refer to "Cartridge Compatibility" on page 6-2. 1. Ensure that the cartridge write-protect switch is in the write enabled position (see "Write-Protect Switch" on page 6-6). 2. Ensure that you have the appropriate data cartridge for your library model (see "Cartridge Compatibility" on page 6-2). 3. Ensure that you are using an Ultrium cartridge that has not been degaussed. Do not degauss Ultrium cartridges. 4. Ensure that the cartridge has not been exposed to harsh environmental or electrical conditions and is not physically damaged in any way. Refer to "Provide Proper Acclimation and Environmental Conditions" on page 6-8 and "Perform a Thorough Inspection" on page 6-8. 5. Many backup applications do not read or write to cartridges that were created using a different backup application. In this case, you may have to perform an erase, reformat, or label replacement operation on the cartridge. 6. Ensure that you understand any data protection or overwrite protection schemes that your backup application may be using, which could prevent you from writing to a given cartridge. 7. Retry the operation with a different, known good cartridge. 8. Clean the drive. See "Service Library: Clean Drive" on page 5-57. 7-4 Dell PowerVault TL2000 Tape Library and TL4000 Tape Library User's Guide
-
 1
1 -
2
-
3
-
4
-
5
-
6
-
7
-
8
-
9
-
10
-
11
-
12
-
13
-
14
-
15
-
16
-
17
-
18
-
19
-
20
-
21
-
22
-
23
-
24
-
25
-
26
-
27
-
28
-
29
-
30
-
31
-
32
-
33
-
34
-
35
-
36
-
37
-
38
-
39
-
40
-
41
-
42
-
43
-
44
-
45
-
46
-
47
-
48
-
49
-
50
-
51
-
52
-
53
-
54
-
55
-
56
-
57
-
58
-
59
-
60
-
61
-
62
-
63
-
64
-
65
-
66
-
67
-
68
-
69
-
70
-
71
-
72
-
73
-
74
-
75
-
76
-
77
-
78
-
79
-
80
-
81
-
82
-
83
-
84
-
85
-
86
-
87
-
88
-
89
-
90
-
91
-
92
-
93
-
94
-
95
-
96
-
97
-
98
-
99
-
100
-
101
-
102
-
103
-
104
-
105
-
106
-
107
-
108
-
109
-
110
-
111
-
112
-
113
-
114
-
115
-
116
-
117
-
118
-
119
-
120
-
121
-
122
-
123
-
124
-
125
-
126
-
127
-
128
-
129
-
130
-
131
-
132
-
133
-
134
-
135
-
136
-
137
-
138
-
139
-
140
-
141
-
142
-
143
-
144
-
145
-
146
-
147
-
148
-
149
-
150
-
151
-
152
-
153
-
154
-
155
-
156
-
157
-
158
-
159
-
160
-
161
-
162
-
163
-
164
-
165
-
166
-
167
-
168
-
 169
169 -
 170
170 -
 171
171 -
 172
172 -
 173
173 -
 174
174 -
 175
175 -
 176
176 -
 177
177 -
 178
178 -
 179
179 -
180
-
181
-
182
-
183
-
184
-
185
-
186
-
187
-
188
-
189
-
190
-
191
-
192
-
193
-
194
-
195
-
196
-
197
-
198
-
199
-
200
-
201
-
202
-
203
-
204
-
205
-
206
-
207
-
208
-
209
-
210
-
211
-
212
-
213
-
214
-
215
-
216
-
217
-
218
-
219
-
220
-
221
-
222
-
223
-
224
-
225
-
226
-
227
-
228
-
229
-
230
-
231
-
232
-
233
-
234
-
235
-
236
-
237
-
238
-
239
-
240
-
241
-
242
-
243
-
244
-
245
-
246
-
247
-
248
-
249
-
250
-
251
-
252
-
253
-
254
-
255
-
256
-
257
-
258
-
259
-
260
-
261
-
262
-
263
-
264
-
265
-
266
-
267
-
268
-
269
-
270
-
271
-
272
-
273
-
274
-
275
-
276
-
277
-
278
-
279
-
280
-
281
-
282
-
283
 |
 |
