Dell Precision 7920 Tower Owners Manual - Page 56
Installing the HDD and ODD frame, Slim Optical Disk Drive, Removing the slim ODD and ODD latch
 |
View all Dell Precision 7920 manuals
Add to My Manuals
Save this manual to your list of manuals |
Page 56 highlights
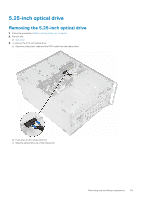
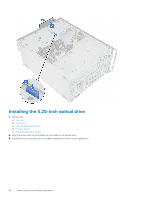
Installing the HDD and ODD frame 1. Install the plastic filler and metal blank if the optical drive is not installed. 2. Align and place the HDD and ODD frame on the system. 3. Gently press down on the frame to secure it to the system. 4. Install the: a) front I/O bezel b) HDD and ODD bezel c) front bezel d) side cover 5. Follow the procedure in After working inside your computer. Slim Optical Disk Drive Removing the slim ODD and ODD latch 1. Follow the procedure in Before working inside the computer. 2. Remove the right side cover 3. To remove the ODD: a) Disconnect the data cable and power cable [1] from the optical drive connector. b) Slide the blue latch towards the left of the chassis, and push the drive forward [2]. 56 Removing and installing components
-
 1
1 -
2
-
3
-
4
-
5
-
6
-
7
-
8
-
9
-
10
-
11
-
12
-
13
-
14
-
15
-
16
-
17
-
18
-
19
-
20
-
21
-
22
-
23
-
24
-
25
-
26
-
27
-
28
-
29
-
30
-
31
-
32
-
33
-
34
-
35
-
36
-
37
-
38
-
39
-
40
-
41
-
42
-
43
-
44
-
45
-
46
-
47
-
48
-
49
-
50
-
 51
51 -
 52
52 -
 53
53 -
 54
54 -
 55
55 -
 56
56 -
 57
57 -
 58
58 -
 59
59 -
 60
60 -
 61
61 -
62
-
63
-
64
-
65
-
66
-
67
-
68
-
69
-
70
-
71
-
72
-
73
-
74
-
75
-
76
-
77
-
78
-
79
-
80
-
81
-
82
-
83
-
84
-
85
-
86
-
87
-
88
-
89
-
90
-
91
-
92
-
93
-
94
-
95
-
96
-
97
-
98
-
99
-
100
-
101
-
102
-
103
-
104
-
105
-
106
-
107
-
108
-
109
-
110
-
111
-
112
-
113
-
114
-
115
-
116
-
117
-
118
-
119
-
120
-
121
-
122
-
123
-
124
-
125
-
126
-
127
 |
 |
