Dell Precision 7920 Tower Owners Manual - Page 63
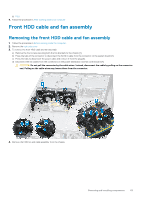
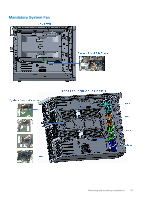
Front HDD cable and fan assembly
 |
View all Dell Precision 7920 manuals
Add to My Manuals
Save this manual to your list of manuals |
Page 63 highlights
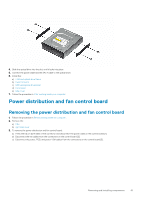
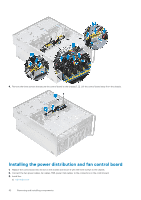
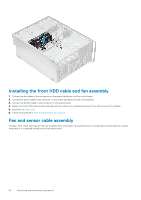
b) PSU 4. Follow the procedure in After working inside your computer Front HDD cable and fan assembly Removing the front HDD cable and fan assembly 1. Follow the procedure in Before working inside the computer. 2. Remove the right side cover 3. To remove the front HDD cable and fan assembly: a) Remove the four screws securing both the fan brackets to the chassis [1]. b) Press the tabs of the connector to disconnect the SATA 0 cable from the connector on the system board [2]. c) Press the tabs to disconnect the power cable and remove it from the plug [3]. d) Disconnect the fan cables from the connectors on the power distribution and fan control board [4]. CAUTION: Do not pull the connector by the cable wires. Instead, disconnect the cable by pulling on the connector end. Pulling on the cable wires may loosen them from the connector. 4. Remove the HDD fan and cable assembly from the chassis. Removing and installing components 63
-
 1
1 -
2
-
3
-
4
-
5
-
6
-
7
-
8
-
9
-
10
-
11
-
12
-
13
-
14
-
15
-
16
-
17
-
18
-
19
-
20
-
21
-
22
-
23
-
24
-
25
-
26
-
27
-
28
-
29
-
30
-
31
-
32
-
33
-
34
-
35
-
36
-
37
-
38
-
39
-
40
-
41
-
42
-
43
-
44
-
45
-
46
-
47
-
48
-
49
-
50
-
51
-
52
-
53
-
54
-
55
-
56
-
57
-
 58
58 -
 59
59 -
 60
60 -
 61
61 -
 62
62 -
 63
63 -
 64
64 -
 65
65 -
 66
66 -
 67
67 -
 68
68 -
69
-
70
-
71
-
72
-
73
-
74
-
75
-
76
-
77
-
78
-
79
-
80
-
81
-
82
-
83
-
84
-
85
-
86
-
87
-
88
-
89
-
90
-
91
-
92
-
93
-
94
-
95
-
96
-
97
-
98
-
99
-
100
-
101
-
102
-
103
-
104
-
105
-
106
-
107
-
108
-
109
-
110
-
111
-
112
-
113
-
114
-
115
-
116
-
117
-
118
-
119
-
120
-
121
-
122
-
123
-
124
-
125
-
126
-
127
 |
 |
