Dell XPS 13 9310 Service Manual - Page 13
Steps
 |
View all Dell XPS 13 9310 manuals
Add to My Manuals
Save this manual to your list of manuals |
Page 13 highlights
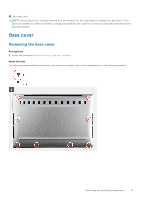
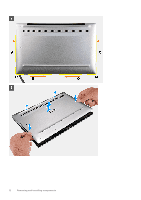
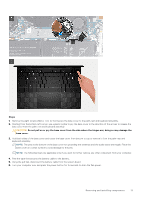
Steps 1. Remove the eight screws (M2x3, Torx 5) that secure the base cover to the palm-rest and keyboard assembly. 2. Starting from the bottom-left corner, use a plastic scribe to pry the base cover in the direction of the arrows to release the base cover from the palm-rest and keyboard assembly. CAUTION: Do not pull on or pry the base cover from the side where the hinges are; doing so may damage the base cover. 3. Hold both sides of the base cover and rotate the base cover from bottom to top to remove it from the palm-rest and keyboard assembly. NOTE: The pins at the bottom of the base cover for grounding the antennas and the audio board are fragile. Place the base cover on a clean surface to avoid damage to the pins. NOTE: The following steps are applicable only if you want to further remove any other component from your computer. 4. Peel the tape that secures the battery cable to the battery. 5. Using the pull tab, disconnect the battery cable from the system board. 6. Turn your computer over and press the power button for 15 seconds to drain the flea power. Removing and installing components 13
-
 1
1 -
2
-
3
-
4
-
5
-
6
-
7
-
 8
8 -
 9
9 -
 10
10 -
 11
11 -
 12
12 -
 13
13 -
 14
14 -
 15
15 -
 16
16 -
 17
17 -
 18
18 -
19
-
20
-
21
-
22
-
23
-
24
-
25
-
26
-
27
-
28
-
29
-
30
-
31
-
32
-
33
-
34
-
35
-
36
-
37
-
38
-
39
-
40
-
41
-
42
-
43
-
44
-
45
-
46
-
47
-
48
-
49
-
50
-
51
-
52
-
53
-
54
-
55
-
56
-
57
-
58
-
59
-
60
-
61
 |
 |
