Dell XPS 13 9310 Service Manual - Page 16
Removing the battery, Installing the battery, support for assistance. See
 |
View all Dell XPS 13 9310 manuals
Add to My Manuals
Save this manual to your list of manuals |
Page 16 highlights
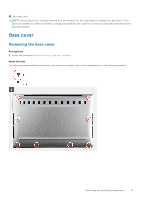
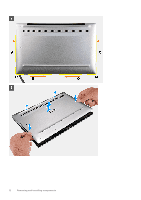
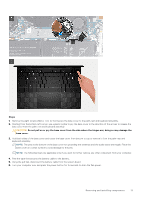
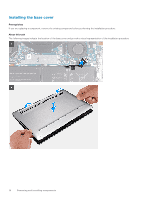
● Do not apply pressure to the surface of the battery. ● Do not bend the battery. ● Do not use tools of any kind to pry on or against the battery. ● Ensure any screws during the servicing of this product are not lost or misplaced, to prevent accidental puncture or damage to the battery and other system components. ● If the battery gets stuck inside your computer as a result of swelling, do not try to release it as puncturing, bending, or crushing a lithium-ion battery can be dangerous. In such an instance, contact Dell technical support for assistance. See www.dell.com/contactdell. ● Always purchase genuine batteries from www.dell.com or authorized Dell partners and resellers. Removing the battery Prerequisites 1. Follow the procedure in Before working inside your computer. 2. Remove the base cover. About this task The following image indicates the location of the battery and provides a visual representation of the removal procedure. Steps 1. Peel off the tape and disconnect the battery cable from the system board, if the battery cable is still connected to the system board. 2. Remove the five screws (M1.6x2.5) that secure the battery to the palm-rest and keyboard assembly. 3. Lift the battery off the palm-rest and keyboard assembly. Installing the battery Prerequisites If you are replacing a component, remove the existing component before performing the installation procedure. 16 Removing and installing components
-
 1
1 -
2
-
3
-
4
-
5
-
6
-
7
-
8
-
9
-
10
-
 11
11 -
 12
12 -
 13
13 -
 14
14 -
 15
15 -
 16
16 -
 17
17 -
 18
18 -
 19
19 -
 20
20 -
 21
21 -
22
-
23
-
24
-
25
-
26
-
27
-
28
-
29
-
30
-
31
-
32
-
33
-
34
-
35
-
36
-
37
-
38
-
39
-
40
-
41
-
42
-
43
-
44
-
45
-
46
-
47
-
48
-
49
-
50
-
51
-
52
-
53
-
54
-
55
-
56
-
57
-
58
-
59
-
60
-
61
 |
 |
