Dewalt DCS361M1 Instruction Manual - Page 11
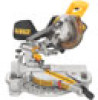
Transporting the Saw Fig. 3, FEATURES AND CONTROLS, Use of XPS, LED Worklight System Fig. 3, Miter
 |
View all Dewalt DCS361M1 manuals
Add to My Manuals
Save this manual to your list of manuals |
Page 11 highlights
FIG. 4 Y AC AB X Z AB AF WARNING: • The guard bracket must be returned to its original full down position and the guard bracket screws tightened before activating the saw. Failure to do so may prevent the guard from closing or may allow the guard to contact the spinning saw blade resulting in damage to the saw and severe personal injury. Transporting the Saw (Fig. 3) WARNING: To reduce the risk of serious personal injury, turn tool off and remove the battery pack before making any adjustments or removing/installing attachments or accessories. An accidental start-up can cause injury. WARNING: To reduce the risk of serious personal injury, ALWAYS lock the rail lock knob, miter lock handle, bevel lock handle, lock down pin and fence adjustment knobs before transporting saw. In order to conveniently carry the miter saw from place to place, a lifting handle (O) has been included on the top of the saw arm and hand indentations (J) in the base, as shown in Figure 3. FEATURES AND CONTROLS WARNING: To reduce the risk of serious personal injury, turn tool off and remove the battery pack before making any adjustments or removing/installing attachments or accessories. An accidental start-up can cause injury. Use of XPSTM LED Worklight System (Fig. 3) CAUTION: Do not stare at operating lamp. NOTE: The battery must be charged and connected to the miter saw. The XPSTM LED Worklight System can be turned on by the momentary switch (Q). The light will automatically turn off within 20 seconds if the saw is not in use. The light is also activated automatically every time the tool's main trigger (A) is pulled. To cut through an existing pencil line on a piece of wood, turn on the XPSTM worklight system using the momentary switch (Q) (not with the main trigger), then pull down on the operating handle (B) to bring the saw blade close to the wood. The shadow of the blade will appear on the wood. This shadow line represents the material that the blade will remove when performing a cut. To correctly locate your cut to the pencil line, align the pencil line with the edge of the blade's shadow. Keep in mind that you may have to adjust the miter or bevel angles in order to match the pencil line exactly. Your saw is equipped with a battery fault feature. The XPSTM worklight begins to flash when the battery is near the end of its useful charge, or when the battery is too hot. Charge the battery prior to continuing cutting applications. Refer to Charging Procedure under Important Safety Instructions for All Battery Packs for battery charging instructions. Miter Control (Fig. 5) The miter lock knob (E) and miter latch button (F) allow you to miter your saw to 48° right and 48° left. The miter latch will automatically locate at 10˚, 15˚, 22.5˚, 31.62˚ and 45˚ both left and right. To miter the saw, unlock the miter lock mechanism by pulling up on the miter lock knob (E). Push the miter latch button (F) down, and set the miter angle desired on the miter scale (H). Lock the miter lock knob by pushing it down. FIG. 5 AH AA AE AD F I H AG E 9 English
-
 1
1 -
2
-
3
-
4
-
5
-
 6
6 -
 7
7 -
 8
8 -
 9
9 -
 10
10 -
 11
11 -
 12
12 -
 13
13 -
 14
14 -
 15
15 -
 16
16 -
17
-
18
-
19
-
20
-
21
-
22
-
23
-
24
-
25
-
26
-
27
-
28
-
29
-
30
-
31
-
32
-
33
-
34
-
35
-
36
-
37
-
38
-
39
-
40
-
41
-
42
-
43
-
44
-
45
-
46
-
47
-
48
-
49
-
50
-
51
-
52
-
53
-
54
-
55
-
56
-
57
-
58
-
59
-
60
-
61
-
62
-
63
-
64
 |
 |
