Dewalt DCS361M1 Instruction Manual - Page 12
Installing and Removing the Battery Pack Fig. 7
 |
View all Dewalt DCS361M1 manuals
Add to My Manuals
Save this manual to your list of manuals |
Page 12 highlights
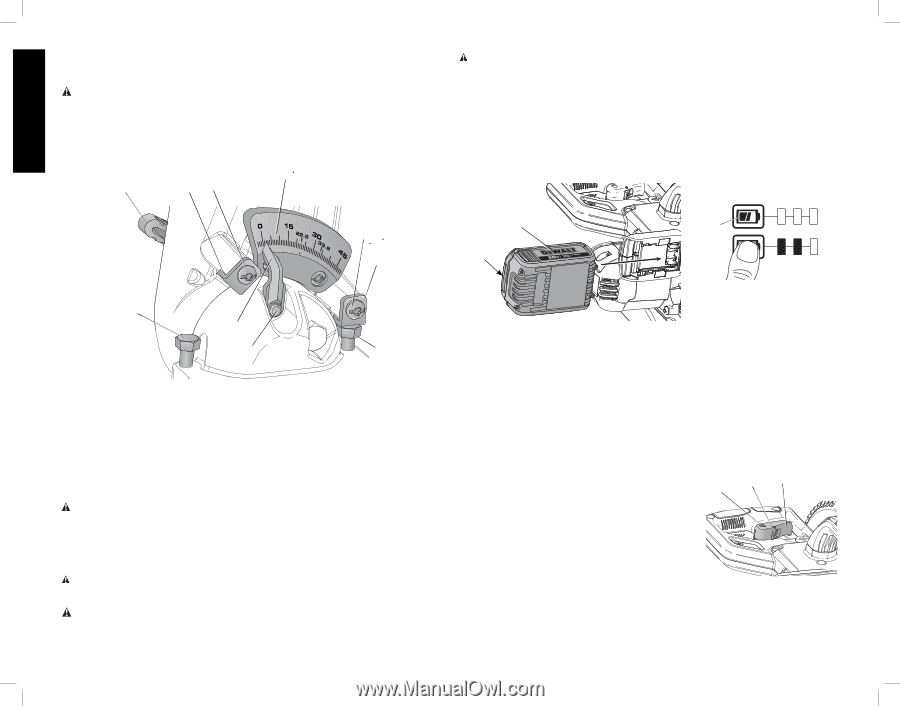
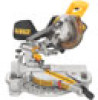
English Bevel Lock Knob (Fig. 3, 6) The bevel lock allows you to bevel the saw 48° to the left. To adjust the bevel setting, turn the bevel lock knob (L) counterclockwise to loosen. To tighten, turn the bevel lock knob clockwise. CAUTION: Pinch hazard. Be sure to tighten bevel lock knob before adjusting overrides. 0° Bevel Stop Override (Fig. 6) The bevel stop override allows you to bevel the saw up to 3° to the right. Loosen the 0° bevel stop override screw (AI) until the 0° bevel stop override bracket (AJ) can freely rotate. Turn the 0° bevel stop override bracket to allow the saw to rotate past the zero bevel position, then retighten the override screw. FIG. 6 AN L AL AK WARNING: To ensure the blade path is clear of obstructions, always make a dry run of the cut without power before making any cuts on the workpiece. Installing and Removing the Battery Pack (Fig. 7) NOTE: For best results, make sure your battery pack is fully charged. To install the battery pack (P) into the tool handle, align the battery pack with the rails inside the tool's handle and slide it into the handle until the battery pack is firmly seated in the tool and ensure that it does not disengage. To remove the battery pack from the tool, press the release button (AO) and firmly pull the battery pack out of the tool handle. Insert it into the charger as described in the charger section of this manual. FIG. 7 FIG. 7A P AI AP AJ AO AU AM AW AT 45º Bevel Stop Override (Fig. 6) The bevel stop override allows you to bevel the saw up to 48° to the left. Loosen the 45° bevel stop override screw (AK) until the 45° stop override bracket (AL) can freely rotate. Turn the 45° bevel stop override bracket (AL) to allow the saw to rotate past the 45° bevel position, then retighten the override screw. Rail Lock Knob (Fig. 3) The rail lock knob (T) allows you to lock the saw head firmly to keep it from sliding on the rails. This is necessary when making certain cuts or when transporting the saw. Lock Down Pin (Fig. 3) WARNING: The lock down pin should be used ONLY when carrying or storing the saw. NEVER use the lock down pin for any cutting operation. To lock the saw head in the down position, push the saw head down, push the lock down pin (W) in and release the saw head. This will hold the saw head safely down for moving the saw from place to place. To release, press the saw head down and pull the pin out. OPERATION WARNING: To reduce the risk of serious personal injury, turn tool off and remove the battery pack before making any adjustments or removing/installing attachments or accessories. An accidental start-up can cause injury. WARNING: Always use eye protection. All users and bystanders must wear eye protection that conforms to ANSI Z87.1 (CAN/CSA Z94.3). FUEL GAUGE BATTERY PACKS (FIG. 7A) Some DEWALT battery packs include a fuel gauge which consists of three green LED lights that indicate the level of charge remaining in the battery pack. To actuate the fuel gauge, press and hold the fuel gauge button (AP). A combination of the three green LED lights will illuminate designating the level of charge left. For the DCS361, when the level of charge in the battery is below the usable limit, the fuel gauge will show one or no LED lights and the battery will need to be recharged. NOTE: The fuel gauge is only an indication of the charge left on the battery pack. It does not indicate tool functionality and is subject to variation based on product components, temperature and end-user application. For more information regarding fuel gauge battery packs, please call 1-800-4-DEWALT (1-800-433-9258) or visit our website www.dewalt.com. Trigger Switch (Fig. 8) FIG. 8 To turn the saw on, push the lock-off lever (R) to the left, R A then depress the trigger switch (A). The saw will run while AR the switch is depressed. Allow the blade to spin up to full operating speed before making the cut. To turn the saw off, release the switch. Allow the blade to stop before raising the saw head. There is no provision for locking the switch on. A hole (AR) is provided in the trigger for insertion of a padlock to lock the switch off. Your saw is not equipped with an automatic electric blade brake, but the saw blade should stop within 5 seconds of trigger release. This is not adjustable. If the stop time repeatedly exceeds 5 seconds, have the tool serviced by an authorized DEWALT service center. Always be sure the blade has stopped before removing it from the kerf. 10
-
 1
1 -
2
-
3
-
4
-
5
-
6
-
 7
7 -
 8
8 -
 9
9 -
 10
10 -
 11
11 -
 12
12 -
 13
13 -
 14
14 -
 15
15 -
 16
16 -
 17
17 -
18
-
19
-
20
-
21
-
22
-
23
-
24
-
25
-
26
-
27
-
28
-
29
-
30
-
31
-
32
-
33
-
34
-
35
-
36
-
37
-
38
-
39
-
40
-
41
-
42
-
43
-
44
-
45
-
46
-
47
-
48
-
49
-
50
-
51
-
52
-
53
-
54
-
55
-
56
-
57
-
58
-
59
-
60
-
61
-
62
-
63
-
64
 |
 |