E-Z-GO RXV - Electric Owner Manual - Page 30
Vehicle Cleaning And Care, Repair
 |
View all E-Z-GO RXV - Electric manuals
Add to My Manuals
Save this manual to your list of manuals |
Page 30 highlights
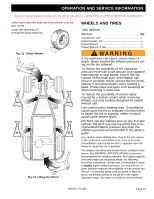
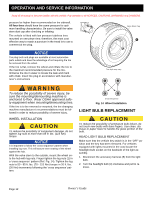
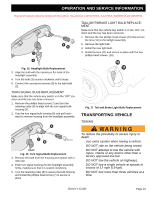
OPERATION AND SERVICE INFORMATION Read all of manual to become familiar with this vehicle. Pay attention to all NOTICES, CAUTIONS, WARNINGS and DANGERS. BVEHICLE CLEANING AND CARE VEHICLE CLEANING To reduce the possibility of severe injury or vehicle damage, read all instructions supplied by the manufacturer of the pressure washer. REPAIR LIFTING THE VEHICLE Tool List Qty. Floor Jack 1 Jack Stands 4 Wheel Chocks 4 Some servicing operations may require the front wheels, the rear wheels, or the entire vehicle be raised. When pressure washing the exterior of the vehicle, do not use pressure in excess of 700 psi. To reduce the possibility of cosmetic damage, do not use any abrasive or reactive solvents to clean plastic parts. It is important that proper techniques and cleaning materials be used. Using excessive water pressure may cause severe injury to the operator or bystander, damage to the seals, plastics, seat material, body finish or electrical system. Do not use pressure in excess of 700 psi to wash the exterior of the vehicle. Clean the windshield with lots of water, a mild soap and a clean cloth. Normal cleaning of vinyl seats and plastic or rubber trim requires the use of a mild soap solution applied with a sponge or soft brush and wiped with a damp cloth. Removal of oil, tar, asphalt, shoe polish, etc., requires the use of a commercially available vinyl/rubber cleaner. The painted surfaces of the vehicle provide attractive appearance and durable protection. Frequent washing with lukewarm or cold water and mild detergent is required to preserve the painted surfaces. Occasional cleaning and waxing with non-abrasive products designed for 'clear coat' automotive finishes will enhance the appearance and durability of the painted surfaces. Corrosive materials used as fertilizers or for dust control can collect on the underbody of the vehicle. These materials will cause corrosion of underbody parts unless flushed occasionally with plain water. Thoroughly clean any areas where mud or other debris can collect. Sediment packed in closed areas should be loosened to ease its removal, taking care not to chip or otherwise damage paint. To reduce the possibility of severe injury or death from a vehicle falling from a jack: Be sure the vehicle is on a firm and level surface. Never get under a vehicle while it is supported by a jack. Use jack stands and test the stability of the vehicle on the stands. Always place chocks in front and behind the wheels not being raised. Use extreme care since the vehicle is extremely unstable during the lifting process. When lifting the vehicle, position the jacks and jack stands at the areas indicated only. To raise the entire vehicle, install the wheel chocks in front and behind each front wheel. Center the jack under the bagwell and place a piece of wood, approximately 2" x 4" x 12", between the jack and the underside of the bagwell. Raise the vehicle and position the jack stands under the frame where the leaf spring mounting bracket is welded to the frame.(Ref. Fig. 13) Lower the jack and test the stability of the vehicle on the two jack stands. Place the jack under the center front of the car just behind the bumper. Raise the vehicle and position the jack stands under the frame where the instrument panel support is attached to the frame.(Ref. Fig. 13) Lower the jack and test the stability of the vehicle on all four jack stands. To raise only the front or rear of the vehicle, place the wheel chocks in front and behind the wheels that are not to be raised. The jack may be left under the center front Page 10 Owner's Guide
-
 1
1 -
2
-
3
-
4
-
5
-
6
-
7
-
8
-
9
-
10
-
11
-
12
-
13
-
14
-
15
-
16
-
17
-
18
-
19
-
20
-
21
-
22
-
23
-
24
-
 25
25 -
 26
26 -
 27
27 -
 28
28 -
 29
29 -
 30
30 -
 31
31 -
 32
32 -
 33
33 -
 34
34 -
 35
35 -
36
-
37
-
38
-
39
-
40
-
41
-
42
-
43
-
44
-
45
-
46
-
47
-
48
-
49
-
50
-
51
-
52
-
53
-
54
-
55
-
56
-
57
-
58
-
59
-
60
 |
 |