E-Z-GO RXV - Electric Owner Manual - Page 42
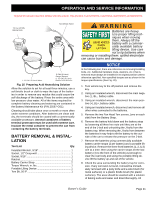
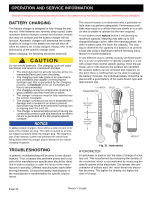
Fig. 26, Battery Removal, Fig. 27, Battery Placement & Orientation, Fig. 28, Battery Components
 |
View all E-Z-GO RXV - Electric manuals
Add to My Manuals
Save this manual to your list of manuals |
Page 42 highlights
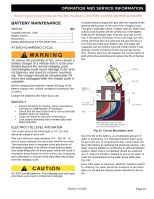
OPERATION AND SERVICE INFORMATION Read all of manual to become familiar with this vehicle. Pay attention to all NOTICES, CAUTIONS, WARNINGS and DANGERS. B metal surfaces that have been cleaned must be primed and painted with a corrosion resistant paint. . Hex Nut Washer Battery Strap Fig. 26 Battery Removal 9. Replace the batteries, using the portable lifting device, starting with the battery located at the back of the battery tray (4), making sure that it is positioned as shown. Battery Hold Down J-bolt Battery Battery Tray FRONT Fig. 27 Battery Placement & Orientation 10. With the J-bolts in the battery hold-down and held in place by the hex nuts on the end of the threaded portion; carefully position the battery hold-down and the battery strap, guiding the J-bolts between the batteries (it may be necessary to tip the batteries slightly) and into the slots in the battery tray. Tighten the hex nuts on the J-bolts making sure that the J-bolts are securely hooked in the battery tray. Tighten the J-bolt hex nuts to 62 - 80 in. lbs. (7 - 9 Nm) torque. 11. Install the two Pan Head Torx drive screws through the ends of the battery strap into the holes on the vehicle frame and tighten them to 80 - 97 in. lbs. (9 - 11 Nm) torque. Fig. 28 Battery Components 12. Inspect all wires and terminals and clean any corro- sion from the battery terminals or wire terminals with a solution of baking soda and water, using a wire brush to completely remove corrosion if required. 13. Carefully replace the wires on the battery terminals as shown (Ref. Fig. 29). Make sure to reconnect the main negative (-) battery cable, BL-, from the controller last. 14. Tighten all battery terminal hardware to 98 - 105 in. lbs. (11 - 12 Nm) torque. 15. Protect the battery terminals and battery cable terminals with a commercially available protective coating. To prevent battery explosion that could result in severe personal injury or death, extreme care must be used with aerosol containers of battery terminal protectant. Insulate the metal container to prevent the metal can from contacting battery terminals which could result in an explosion. Page 22 Owner's Guide
-
 1
1 -
2
-
3
-
4
-
5
-
6
-
7
-
8
-
9
-
10
-
11
-
12
-
13
-
14
-
15
-
16
-
17
-
18
-
19
-
20
-
21
-
22
-
23
-
24
-
25
-
26
-
27
-
28
-
29
-
30
-
31
-
32
-
33
-
34
-
35
-
36
-
 37
37 -
 38
38 -
 39
39 -
 40
40 -
 41
41 -
 42
42 -
 43
43 -
 44
44 -
 45
45 -
 46
46 -
 47
47 -
48
-
49
-
50
-
51
-
52
-
53
-
54
-
55
-
56
-
57
-
58
-
59
-
60
 |
 |
