Epson 1400 User's Guide - Page 39
Adjusting the Print Position with Windows, Start Epson Print CD. - stylus photo ink jet
 |
UPC - 010343859937
View all Epson 1400 manuals
Add to My Manuals
Save this manual to your list of manuals |
Page 39 highlights
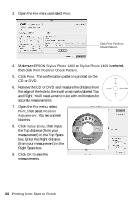
2. Make sure EPSON Stylus Photo 1400 Series is selected. 3. Select CD/DVD or CD/DVD Premium Surface as the Media Type setting. 4. Select None as the Print Confirmation Pattern setting. 5. Click Print. Note: When you set the copies setting to 2 or more, remove each CD or DVD from the tray after it has been printed, and then place the next disc on the tray (see page 35). Press the ) paper button to resume printing. After you print, handle the CD or DVD carefully. To allow the ink to dry, wait at least 24 hours before playing the disc or inserting it in a drive. Keep printed discs away from moisture and direct sunlight. Note: If printing on a full face (hub-printable) disc, you may need to adjust the print position to maximize the print area. If you need to adjust the print position or color, see the next section or page 40. Adjusting the Print Position with Windows If your printed images and text are not centered or positioned the way you want on your CD or DVD, you may need to adjust the printing position. You can also use these steps to check the position before you print on a CD or DVD. 1. Place an extra ink-jet printable CD or DVD on the CD/DVD tray and insert it into the printer, as described on page 35. 2. Start Epson Print CD. 3. Open the File menu and select Print. Click Print Position Confirmation Pattern Printing on CDs and DVDs 39
-
 1
1 -
2
-
3
-
4
-
5
-
6
-
7
-
8
-
9
-
10
-
11
-
12
-
13
-
14
-
15
-
16
-
17
-
18
-
19
-
20
-
21
-
22
-
23
-
24
-
25
-
26
-
27
-
28
-
29
-
30
-
31
-
32
-
33
-
 34
34 -
 35
35 -
 36
36 -
 37
37 -
 38
38 -
 39
39 -
 40
40 -
 41
41 -
 42
42 -
 43
43 -
 44
44 -
45
-
46
-
47
-
48
-
49
-
50
-
51
-
52
-
53
-
54
-
55
-
56
-
57
-
58
-
59
-
60
-
61
-
62
-
63
-
64
-
65
-
66
-
67
-
68
-
69
-
70
-
71
-
72
-
73
-
74
-
75
-
76
-
77
-
78
-
79
-
80
-
81
-
82
-
83
-
84
-
85
-
86
-
87
-
88
 |
 |
