Epson 1400 User's Guide - Page 45
Adjusting the Print Density with a Macintosh, as the Print Density Check Pattern - stylus photo ink level
 |
UPC - 010343859937
View all Epson 1400 manuals
Add to My Manuals
Save this manual to your list of manuals |
Page 45 highlights
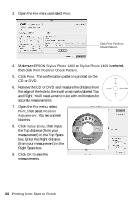
Adjusting the Print Density with a Macintosh If ink smears on your printed CDs or DVDs, you may need to adjust the color saturation or ink density. CDs and DVDs from different manufacturers may absorb ink differently, so you may need to adjust the density for each type of disc. Follow these instructions to print a color saturation check pattern, and then make adjustments as necessary. 1. Place an extra ink jet-printable CD or DVD on the CD/DVD tray and insert it into the printer, as described on page 35. 2. Start Epson Print CD. 3. Open the File menu and select Print. 4. Make sure Stylus Photo 1400 is selected, then click Print Density Check Pattern. 5. Click Print. 6. After the pattern is printed, examine the print. If you need to adjust the color, make the Color Correction setting lighter or darker as necessary. Then repeat these steps, but select either Second Time or Third Time as the Print Density Check Pattern Position setting to print your second or third pattern on the disc. Note: You can print three density patterns on one disc. Each pattern is printed in a different location. 7. Remove the CD or DVD and let it dry for at least 24 hours. Then check the saturation levels again. Note: You can also use the Brightness and Contrast settings in Epson Print CD to adjust color saturation. For additional information, open the Help menu in Epson Print CD and select EPSON Print CD Help. Printing on CDs and DVDs 45
-
 1
1 -
2
-
3
-
4
-
5
-
6
-
7
-
8
-
9
-
10
-
11
-
12
-
13
-
14
-
15
-
16
-
17
-
18
-
19
-
20
-
21
-
22
-
23
-
24
-
25
-
26
-
27
-
28
-
29
-
30
-
31
-
32
-
33
-
34
-
35
-
36
-
37
-
38
-
39
-
 40
40 -
 41
41 -
 42
42 -
 43
43 -
 44
44 -
 45
45 -
 46
46 -
 47
47 -
 48
48 -
 49
49 -
 50
50 -
51
-
52
-
53
-
54
-
55
-
56
-
57
-
58
-
59
-
60
-
61
-
62
-
63
-
64
-
65
-
66
-
67
-
68
-
69
-
70
-
71
-
72
-
73
-
74
-
75
-
76
-
77
-
78
-
79
-
80
-
81
-
82
-
83
-
84
-
85
-
86
-
87
-
88
 |
 |