Epson 1400 User's Guide - Page 53
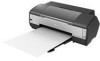
Removing and Installing Ink Cartridges, Open the printer cover. - printer replacement tray
 |
UPC - 010343859937
View all Epson 1400 manuals
Add to My Manuals
Save this manual to your list of manuals |
Page 53 highlights
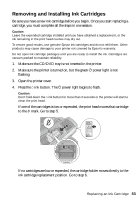
Removing and Installing Ink Cartridges Be sure you have a new ink cartridge before you begin. Once you start replacing a cartridge, you must complete all the steps in one session. Caution: Leave the expended cartridge installed until you have obtained a replacement, or the ink remaining in the print head nozzles may dry out. To ensure good results, use genuine Epson ink cartridges and do not refill them. Other products may cause damage to your printer not covered by Epson's warranty. Do not open ink cartridge packages until you are ready to install the ink. Cartridges are vacuum packed to maintain reliability. 1. Make sure the CD/DVD tray is not inserted in the printer. 2. Make sure the printer is turned on, but the green P power light is not flashing. 3. Open the printer cover. 4. Press the H ink button. The P power light begins to flash. Caution: Don't hold down the H ink button for more than 3 seconds or the printer will start to clean the print head. If one of the cartridges is low or expended, the print head moves that cartridge to the _ mark. Go to step 5. If no cartridges are low or expended, the cartridge holder moves directly to the ink cartridge replacement position. Go to step 6. Replacing an Ink Cartridge 53
-
 1
1 -
2
-
3
-
4
-
5
-
6
-
7
-
8
-
9
-
10
-
11
-
12
-
13
-
14
-
15
-
16
-
17
-
18
-
19
-
20
-
21
-
22
-
23
-
24
-
25
-
26
-
27
-
28
-
29
-
30
-
31
-
32
-
33
-
34
-
35
-
36
-
37
-
38
-
39
-
40
-
41
-
42
-
43
-
44
-
45
-
46
-
47
-
 48
48 -
 49
49 -
 50
50 -
 51
51 -
 52
52 -
 53
53 -
 54
54 -
 55
55 -
 56
56 -
 57
57 -
 58
58 -
59
-
60
-
61
-
62
-
63
-
64
-
65
-
66
-
67
-
68
-
69
-
70
-
71
-
72
-
73
-
74
-
75
-
76
-
77
-
78
-
79
-
80
-
81
-
82
-
83
-
84
-
85
-
86
-
87
-
88
 |
 |
