Epson 7900p Product Information Guide - Page 13
Creating a User’s Logo, Turning On the Password and User’s Logo
 |
UPC - 010343852464
View all Epson 7900p manuals
Add to My Manuals
Save this manual to your list of manuals |
Page 13 highlights
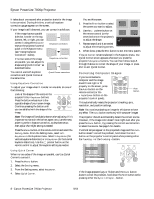
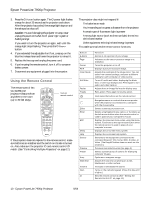
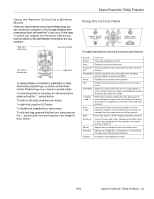
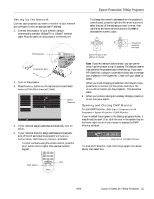
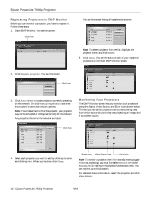
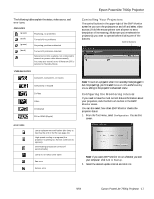
Epson PowerLite 7900p Projector 4. Hold down the Num button on the remote control and use the numeric keypad to enter a 4-digit password. The password will be displayed as ****. After you enter the last digit, a confirmation screen appears. Enter the password again. 5. After you finish setting the password, press the ESC button to return to the Password Protect menu. Num button Numeric keypad 6. Press the Num button to deactivate the numeric keypad. Make a note of the password and keep it in a safe place in case you forget it. Creating a User's Logo You can transfer any image on your computer to the projector, and then use it as the startup screen and/or the screen that is displayed when you press the A/V Mute button. The image can be a company logo, slogan, photograph, or any other image you want to use. Follow these steps to capture the image and transfer it to the projector: 1. Display the image you want to use on the projector. You can use an image from either a computer or video source, such as a VCR. 2. Press the Menu button and select the User's Logo menu. 3. Press Enter to select Execute. Note: If the User's Logo Protect option is ON, you see a message that the logo cannot be recorded. You'll need to disable User's Logo Protect before you can create or change the logo. See the next section, "Turning On the Password and User's Logo." 4. When you see a message asking if you want to use the present image as a user's logo, select Yes and press Enter. A selection box displays over the image. 5. Use the pointer button on the remote control to select the area of the image you want to use. Once you've selected the area, press Enter. 6. When you see the message Select this image?, choose Yes and press Enter. If you want to change the area selected, select No, press Enter, and repeat steps 4 through 6. 7. When you see this screen, select a zoom rate (display size), and then press Enter. User's Logo Set the zoom rate. Zoom rate: 100% 200% 300% 8. When you see the message Save image as user's logo?, select Yes and press Enter. Saving the logo takes about 15 seconds. Do not use the projector or other sources (computer, video, etc.) while the logo is being saved. 9. When you see the message Completed, press ESC. Turning On the Password and User's Logo To enable the password and User's Logo, follow these steps: 1. Press the Freeze button on the remote control for about 5 seconds until you see the Password Protect menu. 2. Select Power ON Protect and press Enter. 3. Select ON and press ESC. 4. If you want to disable the password temporarily, select Timer and press Enter. Then hold down the Num button while you use the numeric keypad to enter the number of hours (from 0 to 9999) you want the password feature disabled. If you want the projector to request the password every time it is turned on, set the timer to 0H. The timer starts counting as soon as you close the Password Protect menu. (You can check the elapsed time in this menu next to Time elapsed.) When the period defined in the Time-elapsed setting has passed, and the password is entered correctly, the elapsed time will be reset to 0H and the timer will start again. Remember to disable or change this setting when you're finished using it. 5. To enable your User's Logo, select User's Logo Protect and press Enter. Then select ON and press Enter. When this feature is on, the logo appears whenever the projector is turned on (if the No-Signal Msg is set to Logo in the Setting menu) and as the A/V Mute screen (if you selected Logo as the A/V Mute setting in the Setting menu). Note: None of the User's Logo features can be changed when the User's Logo Protect function is enabled. 6. Press Menu to close the Password Protect menu. 7. Turn off the projector and unplug the power cord to enable password protection. 9/04 Epson PowerLite 7900p Projector - 13
-
 1
1 -
2
-
3
-
4
-
5
-
6
-
7
-
 8
8 -
 9
9 -
 10
10 -
 11
11 -
 12
12 -
 13
13 -
 14
14 -
 15
15 -
 16
16 -
 17
17 -
 18
18 -
19
-
20
-
21
-
22
-
23
 |
 |
