Epson ActionTower 8000 User Manual - Page 86
Removing an Option Card, Adding Video Memory, Your computer comes with 1MB of video memory. You can
 |
View all Epson ActionTower 8000 manuals
Add to My Manuals
Save this manual to your list of manuals |
Page 86 highlights
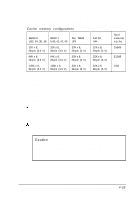
Removing an Option Card You may need to remove an option card to access components on the main system board or if you no longer need it. Refer to the illustrations for your computer and slot type under "Installing an Option Card" as you follow these steps: 1. If you are removing a card from one of the half-length slots in the slim line computer, first remove the slot cover bracket. Then pull the card straight out of the slot. 2. If you are removing a card from the tower computer or from one of the full-length slots in the slim line computer, remove the retaining screw securing the option card to the computer. Then pull the card straight out of the slot. 3. If you are not installing another option card, replace the option slot cover, the slot cover bracket (if necessary), and retaining screw(s). 4. Replace the computer's cover; see "Replacing the Cover." Then see "Post-installation Procedures" for instructions on configuring your computer without your option card. Adding Video Memory Your computer comes with 1MB of video memory. You can increase your video memory to 2MB by installing two 512KB, 40-pin, SOJ flat pack video DRAM chips. Additional video memory is useful for running graphics-intensive applications or for supporting high resolutions with many colors. Note that your video memory sockets may not look exactly like the ones in the illustration. If you're not sure how to install video memory, contact your Authorized EPSON Servicer or the EPSON Connection and ask for assistance. 4-22 Installing and Removing Options
-
 1
1 -
2
-
3
-
4
-
5
-
6
-
7
-
8
-
9
-
10
-
11
-
12
-
13
-
14
-
15
-
16
-
17
-
18
-
19
-
20
-
21
-
22
-
23
-
24
-
25
-
26
-
27
-
28
-
29
-
30
-
31
-
32
-
33
-
34
-
35
-
36
-
37
-
38
-
39
-
40
-
41
-
42
-
43
-
44
-
45
-
46
-
47
-
48
-
49
-
50
-
51
-
52
-
53
-
54
-
55
-
56
-
57
-
58
-
59
-
60
-
61
-
62
-
63
-
64
-
65
-
66
-
67
-
68
-
69
-
70
-
71
-
72
-
73
-
74
-
75
-
76
-
77
-
78
-
79
-
80
-
 81
81 -
 82
82 -
 83
83 -
 84
84 -
 85
85 -
 86
86 -
 87
87 -
 88
88 -
 89
89 -
 90
90 -
 91
91 -
92
-
93
-
94
-
95
-
96
-
97
-
98
-
99
-
100
-
101
-
102
-
103
-
104
-
105
-
106
-
107
-
108
-
109
-
110
-
111
-
112
-
113
-
114
-
115
-
116
-
117
-
118
-
119
-
120
-
121
-
122
-
123
-
124
-
125
-
126
-
127
-
128
-
129
-
130
-
131
-
132
-
133
-
134
-
135
-
136
-
137
-
138
-
139
-
140
-
141
-
142
-
143
-
144
-
145
-
146
-
147
-
148
-
149
-
150
-
151
-
152
-
153
-
154
-
155
-
156
-
157
-
158
-
159
-
160
-
161
-
162
-
163
-
164
-
165
-
166
-
167
-
168
-
169
-
170
-
171
-
172
-
173
-
174
-
175
-
176
-
177
-
178
-
179
-
180
-
181
-
182
-
183
-
184
-
185
-
186
-
187
 |
 |
