Epson B107011F User Manual - Page 22
Installing the SCSI Software for Windows NT 4.0, list. You should see - windows 7
 |
UPC - 010343830202
View all Epson B107011F manuals
Add to My Manuals
Save this manual to your list of manuals |
Page 22 highlights
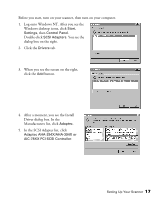
5. When you see a screen indicating that Windows is ready to install the best driver for this device, click Next to begin driver installation. 6. If your system stops installation and requests files from your Windows operating system CD-ROM, replace your scanner software CD-ROM with your Windows disk and click OK to continue. You may be prompted to re-insert the EPSON disk after the Windows disk. 7. When you see a screen indicating that installation is complete, click Finish. The Add New Hardware Wizard closes, and you return to the Windows desktop. 8. To verify that the SCSI board was detected, click Start, Settings, Control Panel, then double-click the System icon. Click the Device Manager tab, if necessary. You should see SCSI controllers in the list. Click the + to expand the list. You should see Adaptec AIC-78XX PCI SCSI in the list. Click OK to close the dialog box. 9. When you're finished, restart your computer. If you're running Windows 98, continue with the instructions on page 19 to install your scanner software. If you're running Windows 95, continue with the instructions on page 24. Installing the SCSI Software for Windows NT 4.0 Depending on how your computer system was originally set up, the SCSI driver may be installed automatically when you start your computer. If not, follow the steps below. You may be asked to insert your Windows operating system CD-ROM during software installation. Please have your Windows CD-ROM handy, in case it is needed. 16 Setting Up Your Scanner
-
 1
1 -
2
-
3
-
4
-
5
-
6
-
7
-
8
-
9
-
10
-
11
-
12
-
13
-
14
-
15
-
16
-
 17
17 -
 18
18 -
 19
19 -
 20
20 -
 21
21 -
 22
22 -
 23
23 -
 24
24 -
 25
25 -
 26
26 -
 27
27 -
28
-
29
-
30
-
31
-
32
-
33
-
34
-
35
-
36
-
37
-
38
-
39
-
40
-
41
-
42
-
43
-
44
-
45
-
46
-
47
-
48
-
49
-
50
-
51
-
52
-
53
-
54
-
55
-
56
-
57
-
58
-
59
-
60
-
61
-
62
-
63
-
64
-
65
-
66
-
67
-
68
-
69
-
70
-
71
-
72
-
73
-
74
-
75
-
76
-
77
-
78
-
79
-
80
-
81
-
82
-
83
-
84
-
85
-
86
-
87
-
88
-
89
-
90
-
91
-
92
-
93
-
94
-
95
-
96
-
97
-
98
-
99
-
100
-
101
-
102
-
103
-
104
-
105
-
106
-
107
-
108
-
109
-
110
-
111
-
112
-
113
-
114
-
115
-
116
-
117
-
118
-
119
-
120
-
121
-
122
-
123
-
124
-
125
-
126
-
127
-
128
-
129
-
130
-
131
-
132
-
133
 |
 |
