Epson B107011F User Manual - Page 79
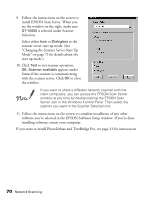
the scanner server in the Network Scanner, window to the right, enter the IP address
 |
UPC - 010343830202
View all Epson B107011F manuals
Add to My Manuals
Save this manual to your list of manuals |
Page 79 highlights
3. Select EPSON TWAIN Pro Network. (A check mark appears beside selected applications.) Click to select other software you want to install, or deselect software that you don't want to install. Then click OK. If you're installing the scanner software on Windows 95 or Windows NT, click EPSON TWAIN Pro to deselect it. EPSON TWAIN Pro only works if the scanner is connected to your computer. 4. Follow the instructions on the screen to continue the installation. When you see the window to the right, enter the IP address of the scanner server in the Network Scanner Address box. 5. Click Test to test the connection. If your computer is communicating with the scanner server and the scanner is on, you see a message that the scanner is available. Then click OK to save your settings. If you need to connect to a different network scanner or change the timeout setting, you can open the EPSON TWAIN Pro Network window anytime by double-clicking the EPSON TWAIN Pro Network icon in the Control Panel. You can enter up to five IP addresses or host names in the Network Scanner Address box. Network Scanning 73
-
 1
1 -
2
-
3
-
4
-
5
-
6
-
7
-
8
-
9
-
10
-
11
-
12
-
13
-
14
-
15
-
16
-
17
-
18
-
19
-
20
-
21
-
22
-
23
-
24
-
25
-
26
-
27
-
28
-
29
-
30
-
31
-
32
-
33
-
34
-
35
-
36
-
37
-
38
-
39
-
40
-
41
-
42
-
43
-
44
-
45
-
46
-
47
-
48
-
49
-
50
-
51
-
52
-
53
-
54
-
55
-
56
-
57
-
58
-
59
-
60
-
61
-
62
-
63
-
64
-
65
-
66
-
67
-
68
-
69
-
70
-
71
-
72
-
73
-
 74
74 -
 75
75 -
 76
76 -
 77
77 -
 78
78 -
 79
79 -
 80
80 -
 81
81 -
 82
82 -
 83
83 -
 84
84 -
85
-
86
-
87
-
88
-
89
-
90
-
91
-
92
-
93
-
94
-
95
-
96
-
97
-
98
-
99
-
100
-
101
-
102
-
103
-
104
-
105
-
106
-
107
-
108
-
109
-
110
-
111
-
112
-
113
-
114
-
115
-
116
-
117
-
118
-
119
-
120
-
121
-
122
-
123
-
124
-
125
-
126
-
127
-
128
-
129
-
130
-
131
-
132
-
133
 |
 |
