Epson B107011F User Manual - Page 24
Installing the Scanner Software - specifications
 |
UPC - 010343830202
View all Epson B107011F manuals
Add to My Manuals
Save this manual to your list of manuals |
Page 24 highlights
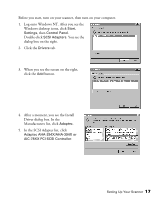
6. When you see the screen on the right prompting you for the location of the driver, check Specify a location. Browse to the following location on the CD-ROM: Adaptec\Ezscsi. Then click Next. (The example screen shows D as the CD-ROM drive letter; your CD-ROM drive letter may be different.) 7. The necessary driver files are copied to your hard drive, then you see a prompt to restart your system. Be sure to close any open windows, then click Yes to restart. 8. After the system restarts, log on again. Windows NT auto-detects the scanner. 9. To verify that the SCSI board was detected, click Start, Settings, Control Panel, and double-click SCSI Adapters. Then click the Devices tab, if necessary. You should see your Adaptec PCI SCSI Controller in the list. Click OK to close the dialog box. Continue with the instructions on page 29 to install your scanner software. Installing the Scanner Software Before you begin installing software, make sure you recalibrate your monitor to factory specifications. Then follow the instructions for your operating system: s If you're running Windows 98, continue with the next section, "Installing the Software for Windows 98." s If you're running Windows 95, go to "Installing the Software for Windows 95" on page 24. s If you're running Windows NT 4.0, go to "Installing the Software for Windows NT 4.0" on page 29. For instructions on installing software for a network scanner, go to Chapter 5, "Network Scanning." 18 Setting Up Your Scanner
-
 1
1 -
2
-
3
-
4
-
5
-
6
-
7
-
8
-
9
-
10
-
11
-
12
-
13
-
14
-
15
-
16
-
17
-
18
-
 19
19 -
 20
20 -
 21
21 -
 22
22 -
 23
23 -
 24
24 -
 25
25 -
 26
26 -
 27
27 -
 28
28 -
 29
29 -
30
-
31
-
32
-
33
-
34
-
35
-
36
-
37
-
38
-
39
-
40
-
41
-
42
-
43
-
44
-
45
-
46
-
47
-
48
-
49
-
50
-
51
-
52
-
53
-
54
-
55
-
56
-
57
-
58
-
59
-
60
-
61
-
62
-
63
-
64
-
65
-
66
-
67
-
68
-
69
-
70
-
71
-
72
-
73
-
74
-
75
-
76
-
77
-
78
-
79
-
80
-
81
-
82
-
83
-
84
-
85
-
86
-
87
-
88
-
89
-
90
-
91
-
92
-
93
-
94
-
95
-
96
-
97
-
98
-
99
-
100
-
101
-
102
-
103
-
104
-
105
-
106
-
107
-
108
-
109
-
110
-
111
-
112
-
113
-
114
-
115
-
116
-
117
-
118
-
119
-
120
-
121
-
122
-
123
-
124
-
125
-
126
-
127
-
128
-
129
-
130
-
131
-
132
-
133
 |
 |
