Epson DS-560 WorkForce DS-560 User Manual - Page 55
Scanning Using OCR - OS X, Convert Scanned Documents to Editable Text OCR, Loading Originals
 |
View all Epson DS-560 WorkForce DS-560 manuals
Add to My Manuals
Save this manual to your list of manuals |
Page 55 highlights
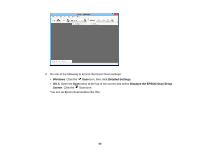
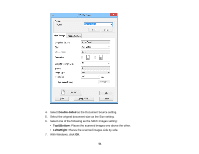
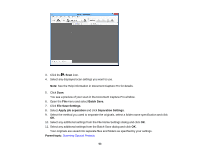
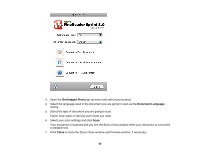
3. Select the language used in the document you are going to scan as the Document Language setting. 4. Click either the Scan to Other Formats icon or the icon that corresponds with the program you want to scan to. 5. If you see the Select Scanner window, select your product and click OK. Note: Do not select a WIA option for your product; it will not work correctly. You see the scan settings window. 6. Select your scan settings. 7. Click Preview and adjust the area you want to scan, if necessary. 8. Click Scan. Note: To scan a multi-page document, select settings in the Multi-Page Scanning section and click Scan for each page. 9. When you are finished scanning, click Close. Your document is scanned and processed into editable text, then you see the Save As window. 10. Select a name and a file format for your document and click Save. The file is saved and then opened in an application associated with the file type you selected, if available on your system. Parent topic: Convert Scanned Documents to Editable Text (OCR) Related topics Loading Originals Scanning Using OCR - OS X You can use the ABBYY FineReader OCR program to convert scanned documents to editable text. 1. Place your original on your product for scanning. 2. Open the Applications folder and click the ABBYY FineReader Sprint icon. You see a window like this: 55
-
 1
1 -
2
-
3
-
4
-
5
-
6
-
7
-
8
-
9
-
10
-
11
-
12
-
13
-
14
-
15
-
16
-
17
-
18
-
19
-
20
-
21
-
22
-
23
-
24
-
25
-
26
-
27
-
28
-
29
-
30
-
31
-
32
-
33
-
34
-
35
-
36
-
37
-
38
-
39
-
40
-
41
-
42
-
43
-
44
-
45
-
46
-
47
-
48
-
49
-
 50
50 -
 51
51 -
 52
52 -
 53
53 -
 54
54 -
 55
55 -
 56
56 -
 57
57 -
 58
58 -
 59
59 -
 60
60 -
61
-
62
-
63
-
64
-
65
-
66
-
67
-
68
-
69
-
70
-
71
-
72
-
73
-
74
-
75
-
76
-
77
-
78
-
79
-
80
-
81
-
82
-
83
-
84
-
85
-
86
-
87
-
88
-
89
-
90
-
91
-
92
-
93
-
94
-
95
-
96
-
97
-
98
-
99
-
100
-
101
-
102
-
103
-
104
 |
 |
