Epson EMP-7600 User Manual - Page 34
Resizing the Image, Adjusting the Tracking and Synchronization
 |
View all Epson EMP-7600 manuals
Add to My Manuals
Save this manual to your list of manuals |
Page 34 highlights
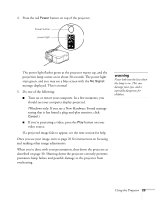
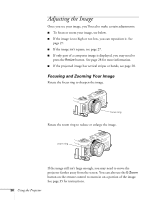
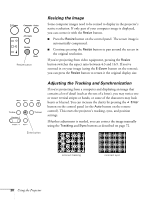
Power Computer Video A/V mute Resize Shift Resize button Resizing the Image Some computer images need to be resized to display in the projector's native resolution. If only part of your computer image is displayed, you can correct it with the Resize button. I Press the Resize button on the control panel. The screen image is automatically compressed. I Continue pressing the Resize button to pan around the screen in the original resolution. If you're projecting from video equipment, pressing the Resize button switches the aspect ratio between 4:3 and 16:9. If you've zoomed in on your image (using the E-Zoom button on the remote), you can press the Resize button to return it the original display size. Menu Sync Esc Help Tracking Keystone Tracking Volume Sync Enter button Adjusting the Tracking and Synchronization If you're projecting from a computer and displaying an image that contains a lot of detail (such as the text of a letter), you may notice one or more vertical stripes or bands, or some of the characters may look heavy or blurred. You can increase the clarity by pressing the Enter button on the control panel (or the Auto button on the remote control). This resets the projector's tracking, sync, and position settings. If further adjustment is needed, you can correct the image manually using the Tracking and Sync buttons as described on page 72. incorrect tracking incorrect sync 28 Using the Projector
-
 1
1 -
2
-
3
-
4
-
5
-
6
-
7
-
8
-
9
-
10
-
11
-
12
-
13
-
14
-
15
-
16
-
17
-
18
-
19
-
20
-
21
-
22
-
23
-
24
-
25
-
26
-
27
-
28
-
 29
29 -
 30
30 -
 31
31 -
 32
32 -
 33
33 -
 34
34 -
 35
35 -
 36
36 -
 37
37 -
 38
38 -
 39
39 -
40
-
41
-
42
-
43
-
44
-
45
-
46
-
47
-
48
-
49
-
50
-
51
-
52
-
53
-
54
-
55
-
56
-
57
-
58
-
59
-
60
-
61
-
62
-
63
-
64
-
65
-
66
-
67
-
68
-
69
-
70
-
71
-
72
-
73
-
74
-
75
-
76
-
77
-
78
-
79
-
80
-
81
-
82
-
83
-
84
-
85
-
86
-
87
-
88
-
89
-
90
-
91
-
92
-
93
-
94
-
95
-
96
-
97
-
98
-
99
-
100
-
101
-
102
-
103
-
104
-
105
-
106
-
107
-
108
-
109
-
110
-
111
-
112
-
113
-
114
 |
 |
