Epson EMP-7600 User Manual - Page 38
Installing the Batteries, Turning On the Remote Control
 |
View all Epson EMP-7600 manuals
Add to My Manuals
Save this manual to your list of manuals |
Page 38 highlights
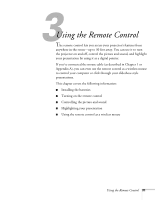
caution When replacing batteries, take the following precautions: I Don't mix old and new batteries. I Replace batteries as soon as they run out. If the batteries leak, wipe away battery fluid with a soft cloth. If fluid gets on your hands, wash them immediately. I Remove batteries if you won't be using the remote control for a long time. Freeze A/V Mute E-Zoom Power R/C ON OFF 3 2 5 4 1 Enter Esc on/off switch light button Installing the Batteries Follow these steps to install the remote control's batteries: 1. Press the tab to release the battery compartment cover. tab 2. Remove the cover and insert the two AA batteries included with the projector as shown. 3. Replace the battery compartment cover. Before you can use the remote control, you need to turn it on as described below. Turning On the Remote Control Make sure the batteries are installed. Then push up the on/off switch on the side of the remote control to turn it on. If you want to make sure the batteries are good, press the round light button. The other buttons on the remote should light up temporarily. If they don't, you need to change the batteries as described above. Turn off the remote control before transporting it or storing it with the projector in a carrying case; this prevents the batteries from discharging if something presses against one of the remote control's buttons. 32 Using the Remote Control
-
 1
1 -
2
-
3
-
4
-
5
-
6
-
7
-
8
-
9
-
10
-
11
-
12
-
13
-
14
-
15
-
16
-
17
-
18
-
19
-
20
-
21
-
22
-
23
-
24
-
25
-
26
-
27
-
28
-
29
-
30
-
31
-
32
-
 33
33 -
 34
34 -
 35
35 -
 36
36 -
 37
37 -
 38
38 -
 39
39 -
 40
40 -
 41
41 -
 42
42 -
 43
43 -
44
-
45
-
46
-
47
-
48
-
49
-
50
-
51
-
52
-
53
-
54
-
55
-
56
-
57
-
58
-
59
-
60
-
61
-
62
-
63
-
64
-
65
-
66
-
67
-
68
-
69
-
70
-
71
-
72
-
73
-
74
-
75
-
76
-
77
-
78
-
79
-
80
-
81
-
82
-
83
-
84
-
85
-
86
-
87
-
88
-
89
-
90
-
91
-
92
-
93
-
94
-
95
-
96
-
97
-
98
-
99
-
100
-
101
-
102
-
103
-
104
-
105
-
106
-
107
-
108
-
109
-
110
-
111
-
112
-
113
-
114
 |
 |
