Epson Ensemble HD 8100 Installation Guide - Page 21
Attach the Mounting Assembly to the Wall (Option 1)
 |
View all Epson Ensemble HD 8100 manuals
Add to My Manuals
Save this manual to your list of manuals |
Page 21 highlights
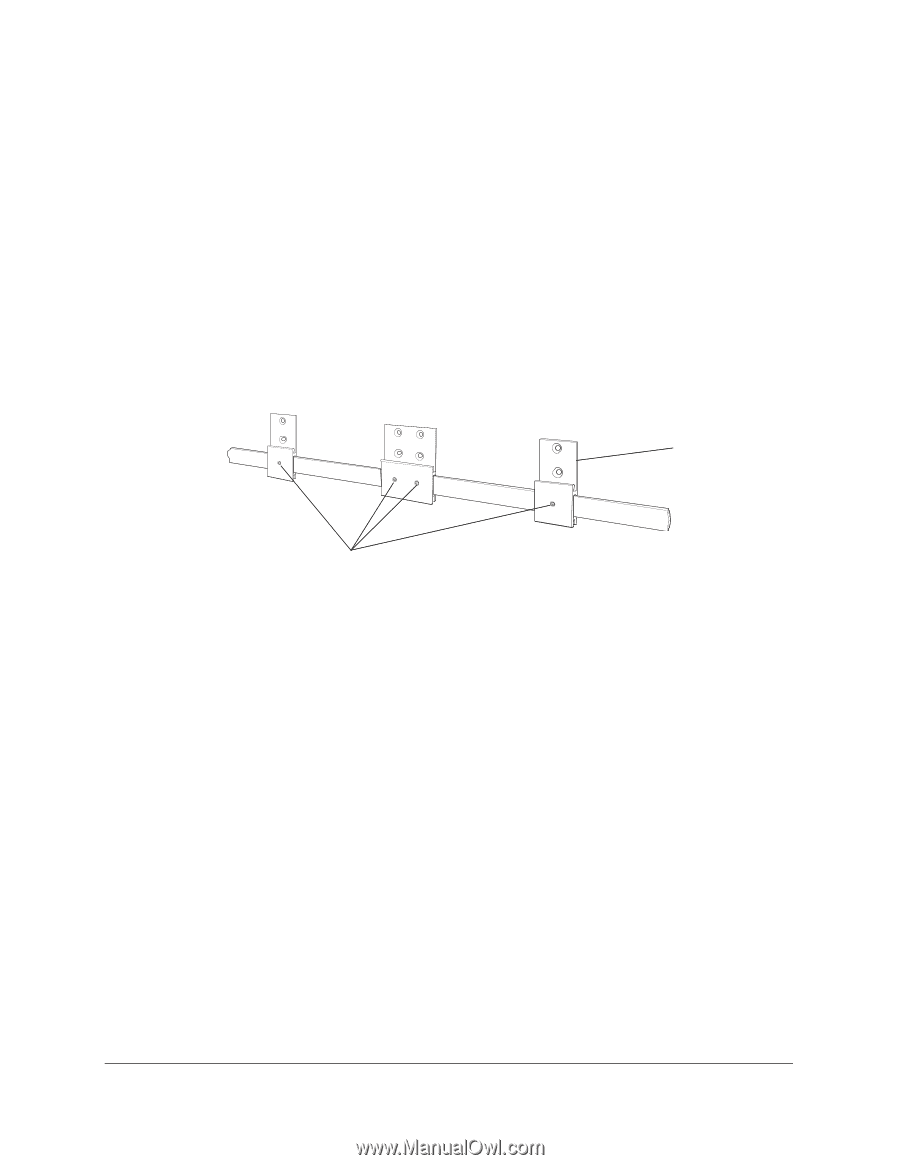
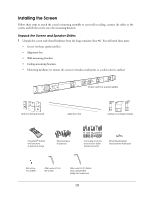
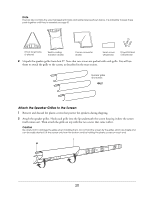
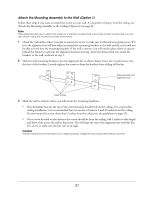
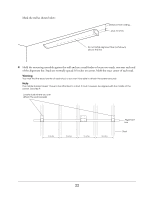
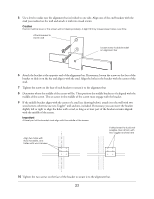
Attach the Mounting Assembly to the Wall (Option 1) Follow these steps if you want to mount the screen on your wall. If you prefer to hang it from the ceiling, see "Attach the Mounting Assembly to the Ceiling (Option 2)"on page 24. Note These steps describe how to attach the screen to a wall with wooden studs. If you have a solid concrete wall, you can also attach it using the included concrete anchor bolts. 1 Check the wall surface where you plan to mount the screen to make sure it's flat and even going across. If it isn't, the alignment bar will bow when you attach the mounting brackets to the wall and the screen will not be able to hook into the mounting brackets. If the wall is uneven, you will need to place shims or spacers behind the brackets to prevent the alignment bar from bowing. Insert the shims when you attach the brackets to the wall, as shown in step 5. 2 Slide the wall-mounting brackets onto the alignment bar, as shown below. Insert the 4 small screws into the face of the brackets. Loosely tighten the screws to keep the brackets from sliding off the bar. Slide brackets onto alignment bar Insert screws 3 Mark the wall to indicate where you will attach the mounting hardware: • First determine how far the top of the screen housing should be from the ceiling. For a typical flatceiling installation, it is recommended that you mount it between 2 and 22 inches from the ceiling. Do not mount the screen closer than 2 inches from the ceiling (see the guidelines on page 15). • Once you've decided on the distance the screen should be from the ceiling, add 3 inches to this length and draw a line across the wall at that point. You will align the top of the alignment bar with this line. Use a level to make sure the line isn't at an angle. Caution The line must be level or the screen won't deploy properly. A slight tilt may cause screen failure over time. 21
-
 1
1 -
2
-
3
-
4
-
5
-
6
-
7
-
8
-
9
-
10
-
11
-
12
-
13
-
14
-
15
-
 16
16 -
 17
17 -
 18
18 -
 19
19 -
 20
20 -
 21
21 -
 22
22 -
 23
23 -
 24
24 -
 25
25 -
 26
26 -
27
-
28
-
29
-
30
-
31
-
32
-
33
-
34
-
35
-
36
-
37
-
38
-
39
-
40
-
41
-
42
-
43
-
44
-
45
-
46
-
47
-
48
-
49
-
50
-
51
-
52
-
53
-
54
-
55
-
56
-
57
-
58
-
59
-
60
-
61
-
62
-
63
-
64
-
65
-
66
-
67
-
68
-
69
-
70
-
71
 |
 |