Epson Ensemble HD 8100 Installation Guide - Page 44
Install the Tracks and Connector Pieces
 |
View all Epson Ensemble HD 8100 manuals
Add to My Manuals
Save this manual to your list of manuals |
Page 44 highlights
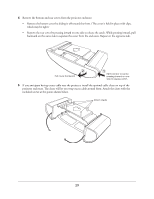
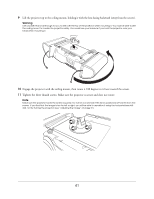
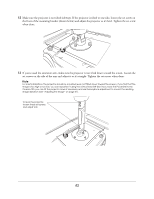
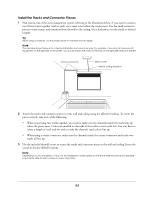
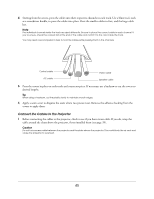
Install the Tracks and Connector Pieces 1 Plan your layout of the wire management system, referring to the illustration below. If you want to connect two 8-foot tracks together (end-to-end), use a seam cover where the tracks meet. Use the small connector pieces to turn corners and transition from the wall to the ceiling. Use a hacksaw to cut the tracks to desired lengths. Tip When using a hacksaw, cut the plastic slowly to maintain smooth edges. Note The example shown below is for a typical installation, but yours may vary. For example, if you plan to have your AV equipment on the right side of the screen, you should attach the tracks to the wall on the right side instead of the left. Corner connector Seam cover Wall-to-ceiling transition 2 Attach the tracks and connector pieces to your wall and ceiling using the adhesive backing. To orient the parts correctly, take note of the following: • When connecting two tracks together, you need to make sure the channels inside the tracks line up where the pieces meet. Colors are marked on the ends of the tracks to assist with this. You may have to rotate a length of track end-for-end to make the channels (and colors) line up. • When using a corner connector, make sure the channels inside the corner connector and in the two tracks all line up. 3 Use the included drywall screws to secure the tracks and connector pieces to the wall and ceiling. Insert the screws at the pre-drilled locations. Note Depending on your installation, it may not be necessary to insert screws at all the pre-drilled locations (for example, you may be able to insert a screw in every other hole). 44
-
 1
1 -
2
-
3
-
4
-
5
-
6
-
7
-
8
-
9
-
10
-
11
-
12
-
13
-
14
-
15
-
16
-
17
-
18
-
19
-
20
-
21
-
22
-
23
-
24
-
25
-
26
-
27
-
28
-
29
-
30
-
31
-
32
-
33
-
34
-
35
-
36
-
37
-
38
-
 39
39 -
 40
40 -
 41
41 -
 42
42 -
 43
43 -
 44
44 -
 45
45 -
 46
46 -
 47
47 -
 48
48 -
 49
49 -
50
-
51
-
52
-
53
-
54
-
55
-
56
-
57
-
58
-
59
-
60
-
61
-
62
-
63
-
64
-
65
-
66
-
67
-
68
-
69
-
70
-
71
 |
 |
